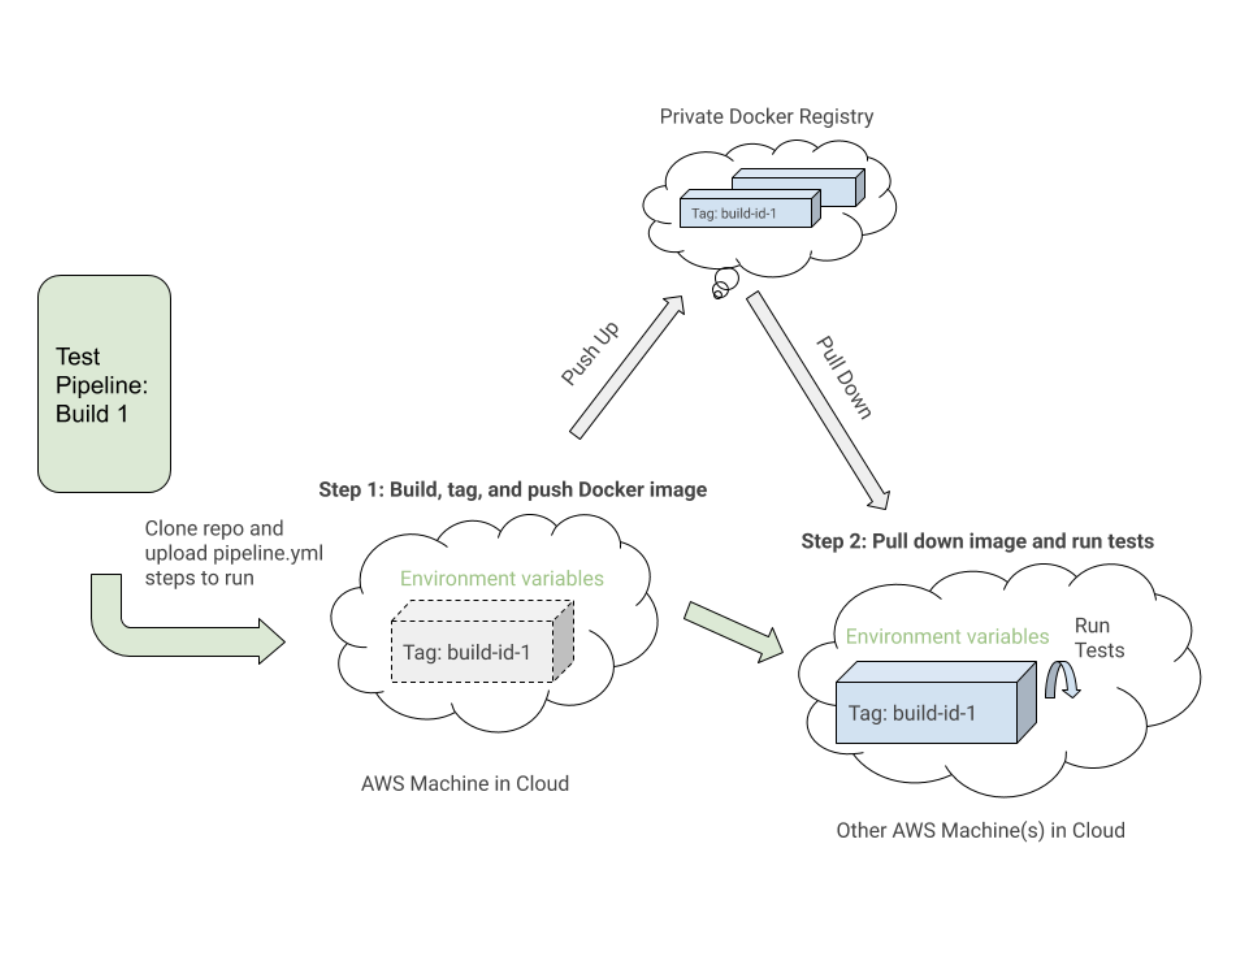
One thing to notice is the first step, “Build UITests Docker Image”, and how it sets up the Docker images for the test. It used the Docker Compose
build command to build the
uitests service with all of the application test code and tagged it with
latest and
${VERSION} environment variable so we can eventually pull down that same image with the proper tag for this build in a future step.
Each step may execute on a different machine in the AWS cloud somewhere, so the tags uniquely identify the image for the specific Buildkite run. After tagging the image, we pushed up the latest and version tagged image up to our private Docker registry to be reused.
In the “Run Webdriver tests against Chrome” step, we pull down the image we built, tagged, and pushed in the first step and start up the Selenium Hub, Chrome, and tests services. Based on environment variables such as
$UITESTENV and
$UITESTSUITE, we would pick and choose the type of command to run like
npm run uitest: and the test suites to run for this specific Buildkite build such as
--suite $UITESTSUITE.
These environment variables would be set through the Buildkite pipeline settings or it would be triggered dynamically from a Bash script that would parse a Buildkite select field to determine which test suites to run and against which environment.
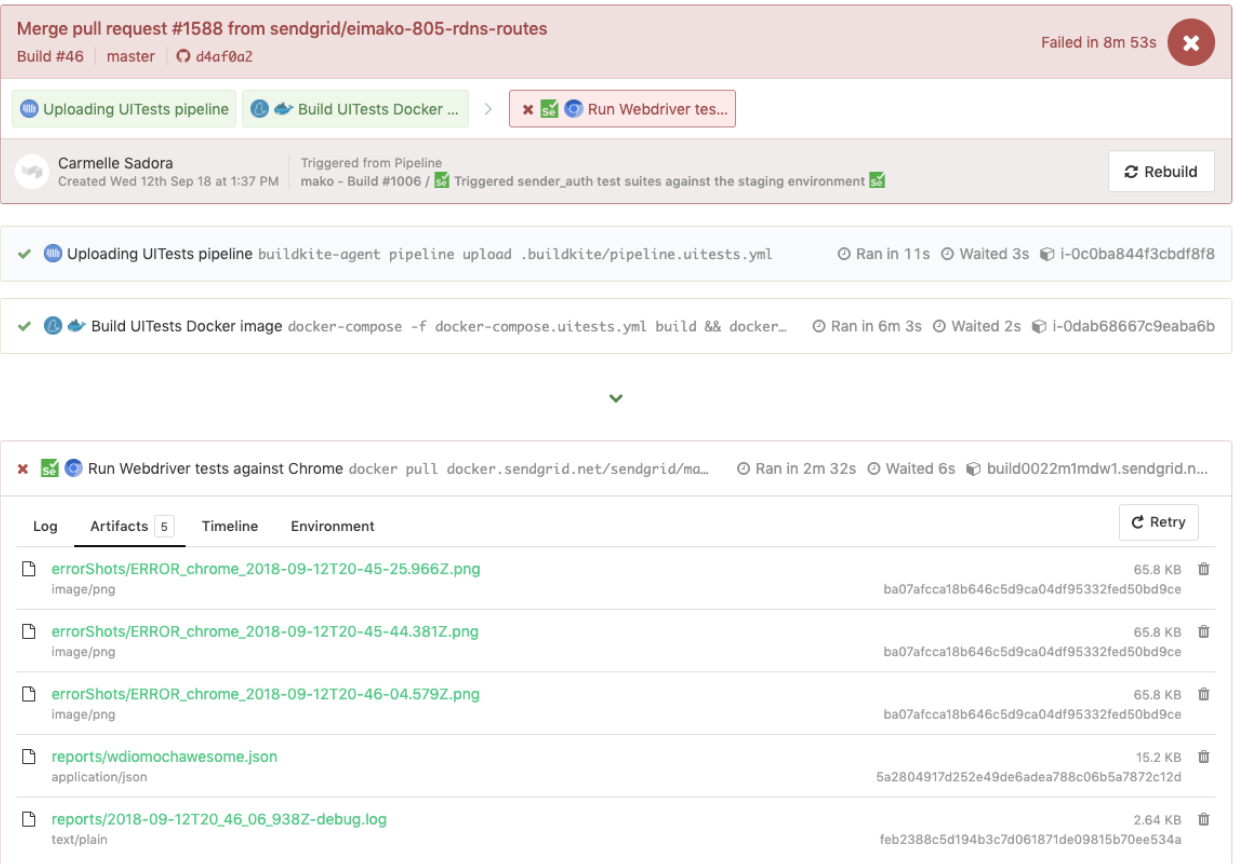
Here is an example of WebdriverIO tests triggered in a dedicated tests pipeline, which also reused the same
pipeline.uitests.yml file but with environment variables set where the pipeline was triggered. This build failed and had error screenshots for us to take a look at under the
Artifacts tab and the console output under the
Logs tab. Remember the
artifact_paths in the
pipeline.uitests.yml (
https://gist.github.com/alfredlucero/71032a82f3a72cb2128361c08edbcff2#file-pipeline-uitests-yml-L38), screenshots settings for `mochawesome` in the `wdio.conf.js` file (
https://gist.github.com/alfredlucero/4ee280be0e0674048974520b79dc993a#file-wdio-conf-js-L39), and mounting of the volumes in the `uitests` service in the `docker-compose.uitests.yml` (
https://gist.github.com/alfredlucero/d2df4533a4a49d5b2f2c4a0eb5590ff8#file-docker-compose-yml-L32)?
We were able to hook up the screenshots to be accessible through the Buildkite UI for us to download directly and see right away to help with debugging tests as shown below.
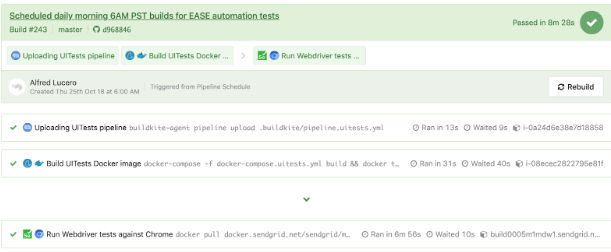
Another example of WebdriverIO tests running in a separate pipeline on a schedule for a specific page using the
pipeline.uitests.yml file except with environment variables already configured in the Buildkite pipeline settings is displayed underneath.
It’s important to note that every CICD provider has different functionality and ways to integrate steps into some sort of deploy process when merging in new code whether it is through
.yml files with specific syntax, GUI settings, Bash scripts, or any other means.
When we switched from
Jenkins to Buildkite, we drastically improved the ability for teams to define their own pipelines within their respective codebases, parallelizing steps across scaling machines on demand, and utilizing easier to read commands.
Regardless of the CICD provider you may use, the strategies of integrating the tests will be similar in setting up the Docker images and running the tests based on environment variables for portability and flexibility.
After converting a considerable number of the custom Ruby Selenium solution tests over to WebdriverIO tests and integrating with Docker and Buildkite, we improved in some areas but still felt similar struggles to the old system that ultimately led us to our next and final stop with
Cypress for our E2E testing solution.
Here is a list of some of the pros we found from our experiences with WebdriverIO in comparison to the custom Ruby Selenium solution:
- Tests were written purely in JavaScript or TypeScript rather than Ruby. This meant less context switching between languages and less time spent re-learning Ruby every time we wrote E2E tests.
- We colocated tests with application code rather than away in a Ruby shared repo. We no longer felt dependent on other teams’ tests failing and took more direct ownership of the E2E tests for our features in our repos.
- We appreciated the option of cross-browser testing. With WebdriverIO we could spin up tests against different capabilities or browsers such as Chrome, Firefox, and IE, though we focused mainly on running our tests against Chrome as over 80% of our users visited our app through Chrome.
- We entertained the possibility of integrating with third-party services. WebdriverIO documentation explained how to integrate with third-party services like BrowserStack and SauceLabs to help with covering our app across all devices and browsers.
- We had the flexibility to choose our own test runner, reporter, and services. WebdriverIO was not prescriptive with what to use so each team took the liberty in deciding whether or not to use things like Mocha and Chai or Jest and other services. This could also be interpreted as a con as teams started to drift from each other’s setup and it required a considerable amount of time to experiment with each of the options for us to choose.
- The WebdriverIO API, CLI, and documentation were serviceable enough to write tests and integrate with Docker and CICD. We could have many different config files, group up specs, execute tests through the command line, and write tests following the page object pattern. However, the documentation could be clearer and we had to dig into a lot of weird bugs. Nonetheless, we were able to convert our tests over from the Ruby Selenium solution.
We made progress in a lot of areas that we lacked in the prior Ruby Selenium solution, but we encountered a lot of showstoppers that prevented us from going all in with WebdriverIO such as the following:
- Since WebdriverIO was still Selenium-based, we experienced a lot of weird timeouts, crashes, and bugs, reminding us of negative flashbacks with our old Ruby Selenium solution. Sometimes our tests would crash altogether when we would select many elements on the page and the tests would run slower than we would like. We had to figure out workarounds through a lot of Github issues or avoided certain methodologies when writing tests.
- The overall developer experience was suboptimal. The documentation provided some high level overview of the commands but not enough examples to explain all the ways to use it. We avoided writing E2E tests with Ruby and finally got to write tests in JavaScript or TypeScript, but the WebdriverIO API was a bit confusing to deal with. Some common examples were the usage of
$ vs. $$ for singular vs. plural elements, $(‘...’).waitForVisible(9000, true) for waiting for an element to not be visible, and other unintuitive commands. We experienced a lot of flaky selectors and had to explicitly $(...).waitForVisible() for everything. - Debugging tests were extremely painful and tedious for devs and QAs. Whenever tests failed, we only had screenshots, which would often be blank or not capturing the right moment for us to deduce what went wrong, and vague console error messages that did not point us in the right direction of how to solve the problem and even where the issue occurred. We often had to re-run the tests many times and stare closely at the Chrome browser running the tests to hopefully put things together as to where in the code our tests failed. We used things like
browser.debug() but it often did not work or did not provide enough information. We gradually gathered a bunch of console error messages and mapped them to possible solutions over time but it took lots of pain and headache to get there. - WebdriverIO tests were tough to set up with Docker. We struggled with trying to incorporate it into Docker as there were many tutorials and ways to do things in articles online, but it was hard to figure out a way that worked in general. Hooking up 2 to 3 services together with all these configurations led to long trial and error experiments and the documentation did not guide us enough in how to do that.
- Choosing the test runner, reporter, assertions, and services demanded lots of research time upfront. Since WebdriverIO was flexible enough to allow other options, many teams had to spend plenty of time to even have a solid WebdriverIO infrastructure after experimenting with a lot of different choices and each team can have a completely different setup that doesn’t transfer over well for shared knowledge and reuse.
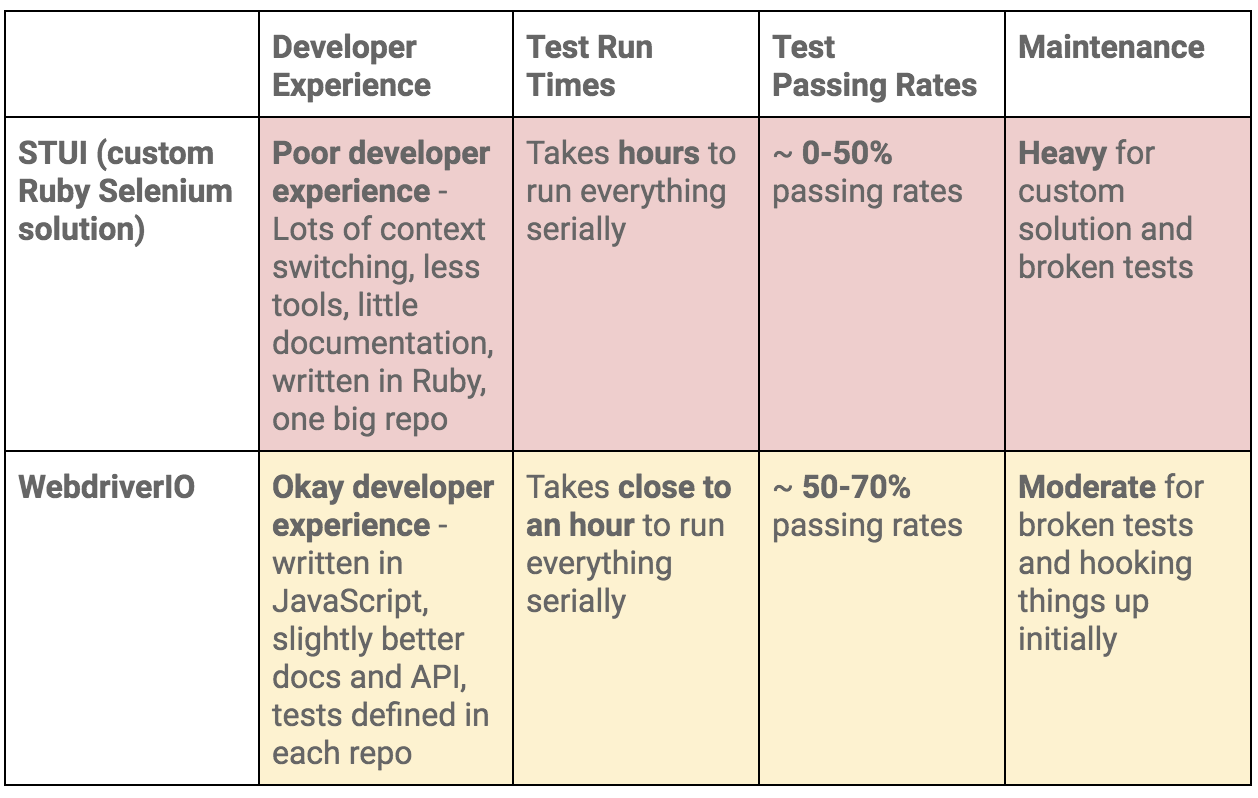
To summarize our WebdriverIO and STUI comparison, we analyzed the overall developer experience (related to tools, writing tests, debugging, API, documentation, etc.), test run times, test passing rates, and maintenance as displayed in this table:
At the end of the day, our WebdriverIO tests were still flaky and tough to maintain. More time was still spent debugging tests in dealing with weird Selenium issues, vague console errors, and somewhat useful screenshots than actually reaping the benefits of seeing tests fail for when the backend or frontend encountered issues.
We appreciated cross-browser testing and implementing tests in JavaScript, but if our tests could not pass consistently without much headache for even Chrome, then it became no longer worth it and we would then simply have a STUI 2.0.
With WebdriverIO we still strayed from the crucial aspect of
providing a way to write consistent, debuggable, maintainable, and valuable E2E automation tests for our frontend applications in our original goal. Overall, we learned a lot about integrating with Buildkite and Docker, using page objects, and outlining tests in a structured way that will transfer over to our final solution with Cypress.
If we felt it was necessary to run our tests in multiple browsers and against various third-party services, we could always circle back to having some tests written with WebdriverIO, or if we needed something fully custom, we would revisit the STUI solution.
Ultimately, neither solution met our main goal for E2E tests, so follow us on our journey in how we migrated from STUI and WebdriverIO to Cypress in
part 2 of the blog post series.