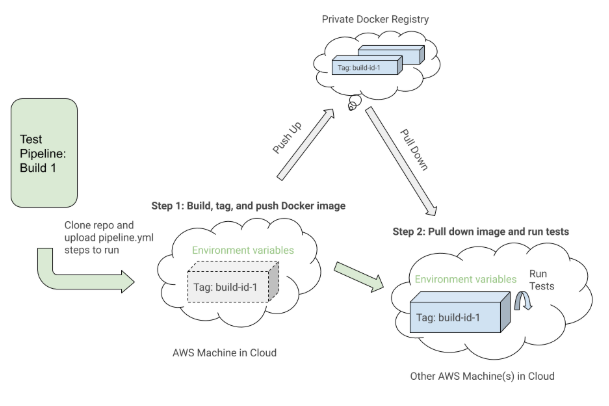
One thing to notice is the first step, “Build Cypress Docker Image”, and how it sets up the Docker image for the test. It used the Docker Compose
build command to build the
cypress service with all of the application test code and tagged it with the
latest and
${VERSION} environment variable so we can eventually pull down that same image with the proper tag for this build in a future step. Each step may execute on a different machine in the AWS cloud somewhere, so the tags uniquely identify the image for the specific Buildkite run. After tagging the image, we pushed up the latest and version tagged image up to our private Docker registry to be reused.
In the “Run Cypress tests” step, we pull down the image we built, tagged, and pushed in the first step and start up the Cypress service to execute the tests. Based on environment variables such as
SPECS and
BASE_URL, we would run specific test files against a certain deployed app environment for this specific Buildkite build. These environment variables would be set through the Buildkite pipeline settings or it would be triggered dynamically from a Bash script that would parse a Buildkite select field to determine which test suites to run and against which environment.
When we select which tests to run during our Buildkite CICD deploy pipeline and trigger a dedicated triggered tests pipeline with certain exported environment variables, we follow the steps in the
pipeline.cypress.yml file to make it happen. An example of triggering the tests after deploying some new code to a feature branch environment from the deploy pipeline looks like this:

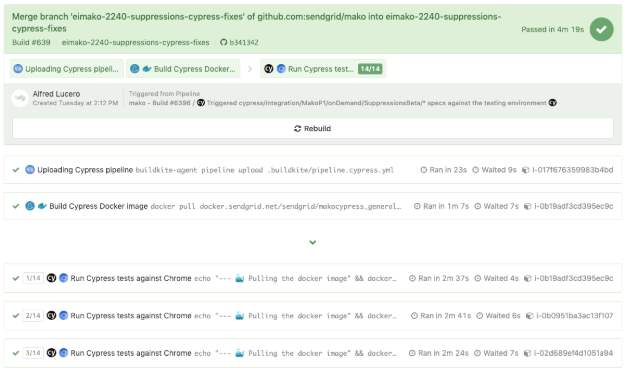
The triggered tests would run in a separate pipeline and after following the “Build #639” link, it would take us to the build steps for the triggered test run like below:
Reusing the same
pipeline.cypress.yml file for our dedicated Cypress Buildkite pipelines running on a schedule, we have builds such as the one running our “P1”, highest priority E2E tests, as shown in the photo underneath:
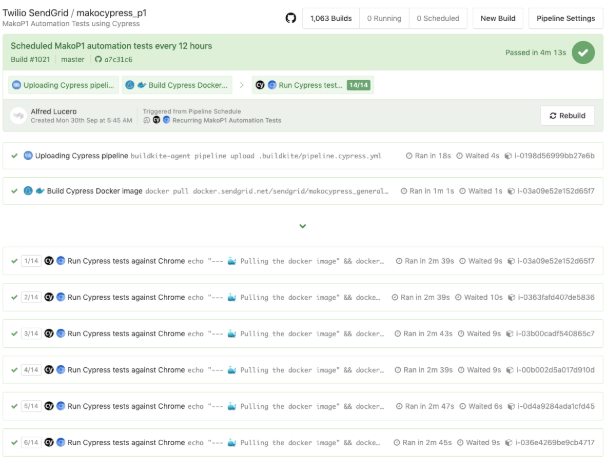
All we have to do is set the proper environment variables for things such as which specs to run and which backend environment to hit in the Buildkite pipeline’s settings. Then, we can configure a Cron scheduled build, which is also in the pipeline settings, to kick off every certain number of hours and we are good to go. We would then create many other separate pipelines for specific feature pages as needed to run on a schedule in a similar way and we would only vary the Cron schedule and environment variables while once again uploading the same `pipeline.cypress.yml` file to execute.
In each of those “Run Cypress tests” steps, we can see the console output with a link to the recorded test run in the
paid Dashboard Service, the central place to manage your team’s test recordings, billing, and other Cypress stats. Following the Dashboard Service link would take us to a results view for developers and QAs to take a look at the console output, screenshots, video recordings, and other metadata if required such as this:

After diving into our own custom Ruby Selenium solution in STUI, WebdriverIO, and finally Cypress tests, we recorded our tradeoffs between Cypress and Selenium wrapper solutions.
Pros
- It’s not another Selenium wrapper - Our previous solutions came with a lot of Selenium quirks, bugs, and crashes to work around and resolve, whereas Cypress arrived without the same baggage and troubles to deal with in allowing us full access to the browser.
- More resilient selectors - We no longer had to explicitly wait for everything like in WebdriverIO with all the
$(.selector).waitForVisible() calls and now rely on cy.get(...) and cy.contains(...) commands with their default timeout. It will automatically keep on retrying to retrieve the DOM elements and if the test demanded a longer timeout, it is also configurable per command. With less worrying about the waiting logic, our tests became way more readable and easier to chain. - Vastly improved developer experience - Cypress provides a large toolkit with better and more extensive documentation for assertions, commands, and setup. We loved the options of using the Cypress GUI, running in headless mode, executing in the command-line, and chaining more intuitive Cypress commands.
- Significantly better developer efficiency and debugging - When running the Cypress GUI, one has access to all of the browser console to see some helpful output, time travel debug and pause at certain commands in the command log to see before and after screenshots, inspect the DOM with the selector playground, and discern right away at which command the test failed. In WebdriverIO or STUI we struggled with observing the tests run over and over in a browser and then the console errors would not point us toward and would sometimes even lead us astray from where the test really failed in the code. When we opted to run the Cypress tests in headless mode, we got console errors, screenshots, and video recordings. With WebdriverIO we only had some screenshots and confusing console errors. These benefits resulted in us cranking out E2E tests much faster and with less overall time spent wondering why things went wrong. We recorded it took less developers and often around 2 to 3 times less days to write the same level of complicated tests with Cypress than with WebdriverIO or STUI.
- Network stubbing and mocking - With WebdriverIO or STUI, there was no such thing as network stubbing or mocking in comparison to Cypress. Now we can have endpoints return certain values or we can wait for certain endpoints to finish through
cy.server() and cy.route(). - Less time to set up locally - With WebdriverIO or STUI, there was a lot of time spent up front researching which reporters, test runners, assertions, and services to use, but with Cypress, it came bundled with everything and started working after just doing an
npm install cypress. - Less time to set up with Docker - There are a bunch of ways to set up WebdriverIO with Selenium, browser, and application images that took us considerably more time and frustration to figure out in comparison to Cypress’s Docker images to use right out of the gate.
- Parallelization with various CICD providers - We were able to configure our Buildkite pipelines to spin up a certain number of AWS machines to run our Cypress tests in parallel to dramatically speed up the overall test run time and uncover any flakiness in tests using the same resources. The Dashboard Service would also recommend to us the optimal number of machines to spin up in parallel for the best test run times.
- Paid Dashboard Service - When we run our Cypress tests in a Docker container in a Buildkite pipeline during CICD, our tests are recorded and stored for us to look at within the past month through a paid Dashboard Service. We have a parent organization for billing and separate projects for each frontend application to check out console output, screenshots, and recordings of all of our test runs.
- Tests are way more consistent and maintainable - Tests passed way more consistently with Cypress in comparison to WebdriverIO and STUI where the tests kept on failing so much to the point where they were often ignored. Cypress tests failing more often signaled actual issues and bugs to look into or suggested better ways to refactor our tests to be less flaky. With WebdriverIO and STUI, we wasted a lot more time in maintaining those tests to be somewhat useful, whereas with Cypress, we would every now and then adjust the tests in response to changes in the backend services or minor changes in the UI.
- Tests are faster - Builds passed way more consistently and overall test run times would be around 2 to 3 times faster when run serially without parallelization. We used to have overall test runs that would take hours with STUI and around 40 minutes with WebdriverIO, but now with way more tests and with the help of parallelization across many machine nodes, we can run over 200 tests in under 5 minutes.
- Room to grow with added features in the future - With a steady open-source presence and dedicated Cypress team working towards releasing way more features and improvements to the Cypress infrastructure, we viewed Cypress as a safer bet to invest in rather than STUI, which would require us to engineer and solve a lot of the headaches ourselves, and WebdriverIO, which appeared to feel more stagnant in new features added but with the same baggage as other Selenium wrappers.
Cons
- Lack of cross-browser support - As of this writing, we can only run our tests against Chrome. With WebdriverIO, we could run tests against Chrome, Firefox, Safari, and Opera. STUI also provided some cross-browser testing, though in a much limited form since we created a custom in-house solution
- Cannot integrate with some third-party services - With WebdriverIO, we had the option to integrate with services like BrowserStack and Sauce Labs for cross-browser and device testing. However, with Cypress there are no such third-party integrations but there are some plugins with services like Applitools for visual regression testing available. STUI, on the other hand, also had some small integrations with TestRail , but as a compromise, we log out the TestRail links in our Cypress tests so we can refer back to them if we needed to.
- Requires workarounds to test with iframes - There are some issues around handling iframes with Cypress. We ended up creating a global Cypress command to wrap how to deal with retrieving an iframe’s contents as there is no specific API to deal with iframes like how WebdriverIO does.
To summarize our STUI, WebdriverIO, and Cypress comparison, we analyzed the overall developer experience (related to tools, writing tests, debugging, API, documentation, etc.), test run times, test passing rates, and maintenance as displayed in this table:
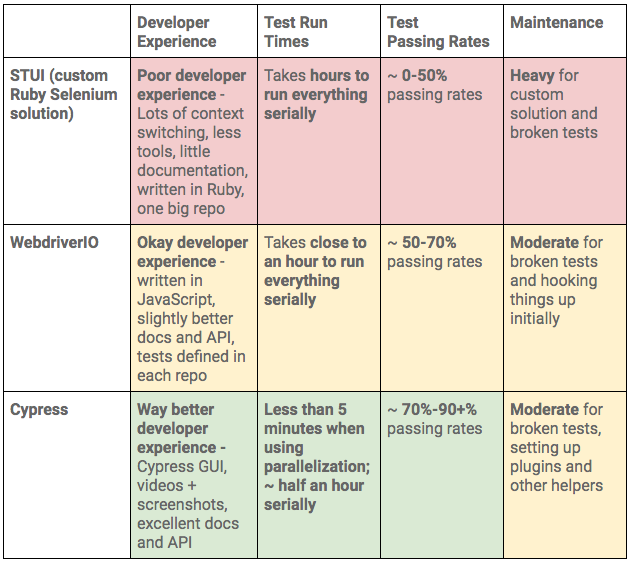
Following our analysis of the pros and cons of Cypress versus our previous solutions, it was pretty clear Cypress would be our best bet to accomplish our goal of writing fast, valuable, maintainable, and debuggable E2E tests we could integrate with CICD.
Though Cypress lacked features such as cross-browser testing and other integrations with third-party services that we could have had with STUI or WebdriverIO, we most importantly need tests that work more often than not and with the right tools to confidently fix broken ones. If we ever needed cross-browser testing or other integrations we could always still circle back and use our knowledge from our trials and experiences with WebdriverIO and STUI to still run a subset of tests with those frameworks.
We finally presented our findings to the rest of the frontend organization, engineering management, architects, and product. Upon demoing the Cypress test tools and showcasing our results between WebdriverIO/STUI and Cypress, we eventually received approval to standardize and adopt Cypress as our E2E testing library of choice for our frontend teams.
After successfully proving that using Cypress was the way to go for our use cases, we then focused on scaling it across all of our frontend teams’ repos. We shared lessons learned and patterns of how to get up and running, how to write consistent, maintainable Cypress tests, and of how to hook those tests up during CICD or in scheduled Cypress Buildkite pipelines.
To promote greater visibility of test runs and gain access to a private monthly history of recordings, we established our own organization to be under one billing method to pay for the Dashboard Service with a certain recorded test run limit and maximum number of users in the organization to suit our needs.
Once we set up an umbrella organization, we invited developers and QAs from different frontend teams and each team would install Cypress, open up the Cypress GUI, and inspect the “Runs” and “Settings” tab to get the “Project ID” to place in their `cypress.json` configuration and “Record Key” to provide in their command options to start recording tests to the Dashboard Service. Finally, upon successfully setting up the project and recording tests to the Dashboard Service for the first time, logging into the Dashboard Service would show that team’s repo under the “Projects” tab like this:

When we clicked a project like “mako”, we then had access to all of the test runs for that team’s repo with quick access to console output, screenshots, and video recordings per test run upon clicking each row as shown below:
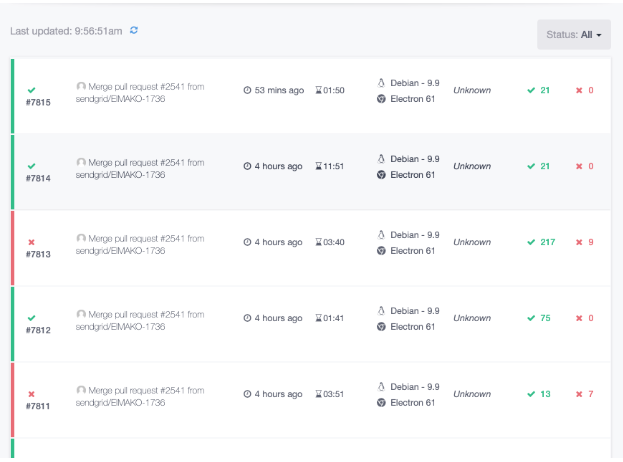
For more insights into our integration, we set up many separate dedicated test pipelines to run specific, crucial page tests on a schedule like say every couple hours to once per day. We also added functionality in our main Buildkite CICD deploy pipeline to select and trigger some tests against our feature branch environment and staging environment.
As one could expect, this quickly blew through our allotted recorded test runs for the month, especially since there are multiple teams contributing and triggering tests in various ways. From experience, we recommend being mindful of how many tests are running on a schedule, how frequent those tests are run, and what tests are run during CICD. There may be some redundant test runs and other areas to be more frugal such as dialing back the frequency of scheduled test runs or possibly getting rid of some altogether for triggering tests only during CICD.
The same rule of being frugal applies to adding users as we emphasized providing access to only developers and QAs in the frontend teams who will be using the Dashboard Service heavily rather than upper management and other folks outside of those teams to fill those limited spots.
As we mentioned before, Cypress demonstrated a lot of promise and potential for growth in the open source community and with its dedicated team in charge of delivering more helpful features for us to use with our E2E tests. A lot of the downsides we highlighted are currently being addressed and we look forward to things such as:
- Cross-browser support - This is a big one because a lot of the push back from us adopting Cypress came from its usage of only Chrome in comparison to Selenium-based solutions, which supported browsers such as Firefox, Chrome, and Safari. Thankfully, more reliable, maintainable, and debuggable tests won out for our organization and we hope to boost up our test suites with more cross-browser tests in the future when the Cypress team releases such cross-browser support.
- Network layer rewrite - This is also a huge one as we tend to use the Fetch API heavily in our newer React areas and in older Backbone/Marionette application areas we still used jQuery AJAX and normal XHR-based calls. We can easily stub out or listen for requests in the XHR areas, but had to do some hacky workarounds with fetch polyfills to achieve the same effect. The network layer rewrite is supposed to help alleviate those pains.
- Incremental improvements to the Dashboard Service - We already saw some new UI changes to the Dashboard Service recently and we hope to continue to see it grow with more stat visualizations and breakdowns of useful data. We also use the parallelization feature heavily and check out our failing test recordings in the Dashboard Service often, so any iterative improvements to layout and/or features would be nice to see.
For our organization, we valued the developer efficiency, debugging, and stability of the Cypress tests when run under the Chrome browser. We achieved consistent, valuable tests with less maintenance down the road and with many tools to develop new tests and fix existing ones.
Overall, the documentation, API, and tools at our disposal far outweighed any cons. After experiencing the Cypress GUI and paid Dashboard Service, we definitely did not want to go back to WebdriverIO or our custom Ruby Selenium solution.
We hooked up our tests with Buildkite and accomplished our goal of
providing a way to write consistent, debuggable, maintainable, and valuable E2E automation tests for our frontend applications to integrate with CICD. We proved with evidence to the rest of the frontend teams, engineering higher ups, and product owners of the benefits of adopting Cypress and dropping WebdriverIO and STUI.
Hundreds of tests laters across frontend teams in Twilio SendGrid and we caught many bugs in our staging environment and were able to quickly fix any flaky tests on our side with much more confidence than ever before. Developers and QAs no longer dread the thought of writing E2E tests but now look forward to writing them for every single new feature we release or for every older feature that could use some more coverage.


