The Definitive Checklist for SEO on Your Shopify Store
Conquer SEO for your unique online store.
Conquer SEO for your unique online store.
Something like 20 percent of all stores on the web are on Shopify, making it one of the most popular ecommerce platforms in the world.
It’s easy to see why it’s so widely used. You can plug in, set up, and start selling in minutes.
However, when it comes to marketing your business online, that’s where things get tricky. How do you make your Shopify store stand out in a crowd of 12 million ecommerce stores on the web?
It’s easy to get lost in the world of SEO, so we wrote this guide to help new and growing stores conquer SEO easily. In this guide, we’ll cover our definitive checklist for search engine optimization on your Shopify store. Let’s go!
If you haven’t already, you should verify your Search Console accounts before starting any SEO work.
Most search engines offer Search Console or Webmaster Tools portals. These are user dashboards that show you what the search engine sees: pages that have been crawled, the errors it has found and even what users were looking for when they found you.
By verifying your Search Console accounts, you can track the progress of your SEO work as you do it. It will also alert you as soon as the search engine finds something concerning, so you can correct SEO issues before they impact your bottom line.
For merchants in the Americas and Europe, it’s worthwhile to verify accounts on both Google and Bing. Merchants who serve China or the Russian Federation should also consider accounts on Baidu or Yandex.
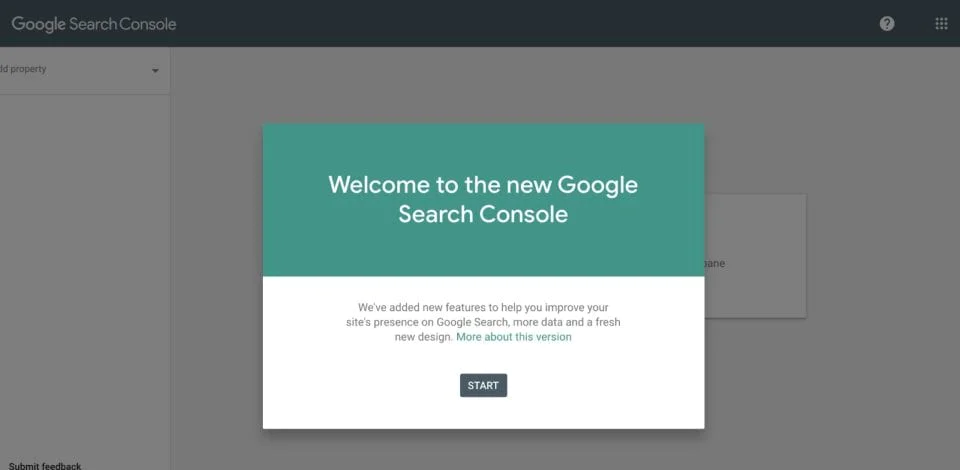
To verify your Google Search Console account, first go to https://search.google.com/search-console/ownership
Your screen will look something like the image below. Click “Start.”
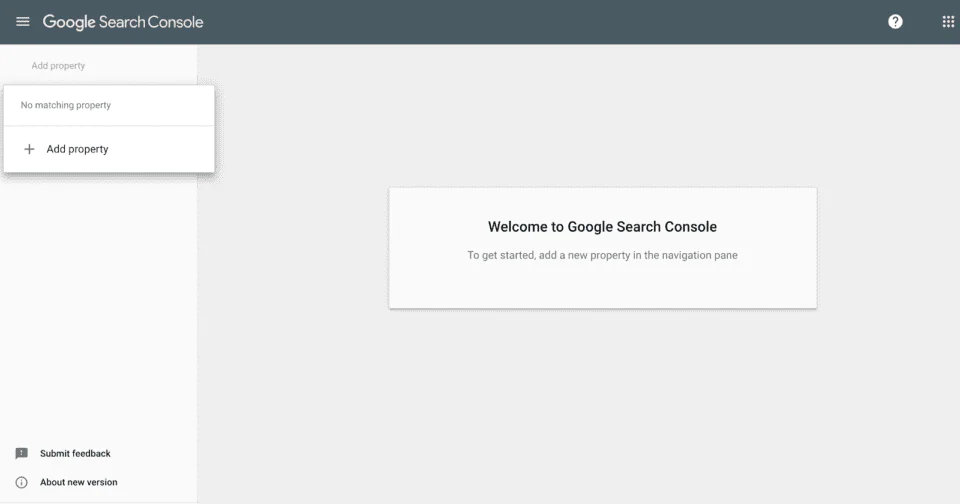
Next, on the left hand side, you’ll see a menu that says “Add property.” Click that, and then the plus next to “Add property.”
It will ask you which domain you’d like to verify and how you’d like to verify it. If you’re comfortable working with DNS records, feel free to verify Search Console using the domain method, but for this guide, we’ll select “URL Prefix.”
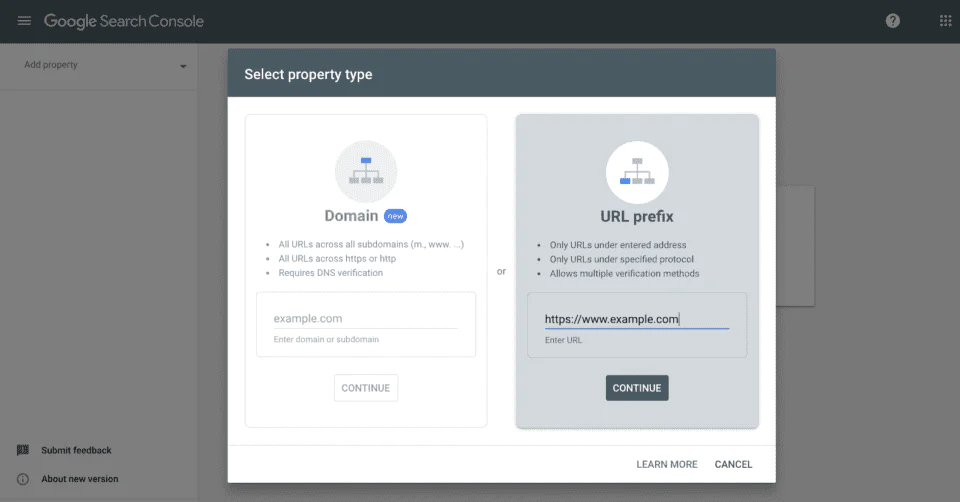
Enter your website in the empty field. On the next step, it will ask you how you’d like to verify your URL prefix. The easiest way to do this in Shopify is by choosing “HTML tag.”
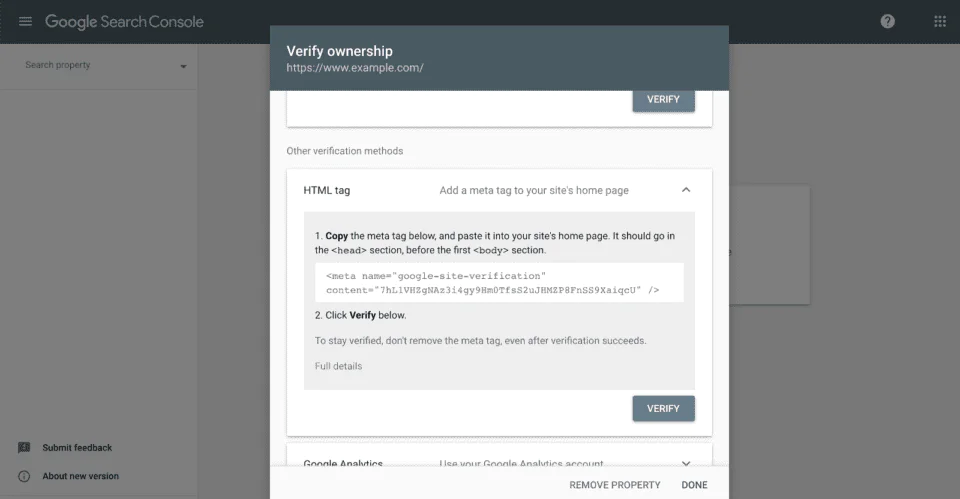
Copy this snippet of code, save it on a notepad somewhere safe and keep this tab open in your browser. Now, switch to a new tab and open your Shopify dashboard.
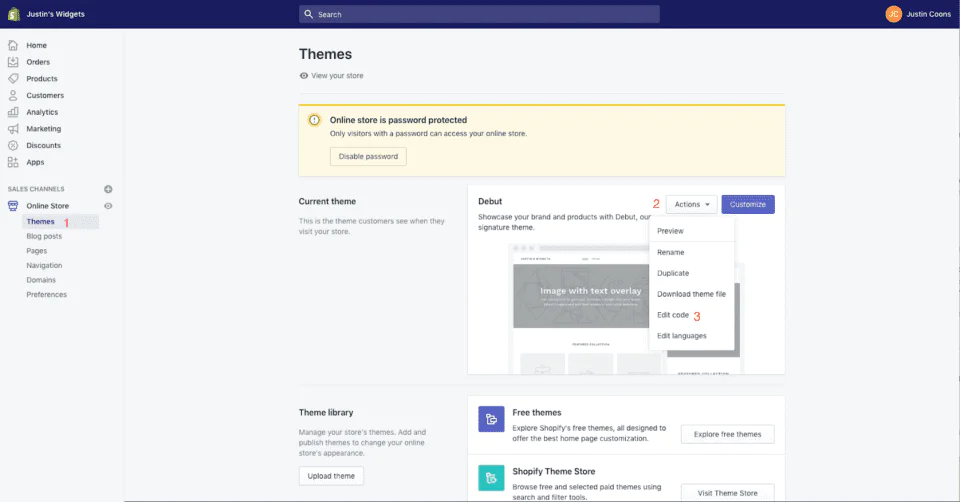
On the left hand menu click “Themes” (1 in the screenshot above), and then click the “Actions” button next to your active theme (2) and then “Edit Code” (3). This will bring us to the code editor.
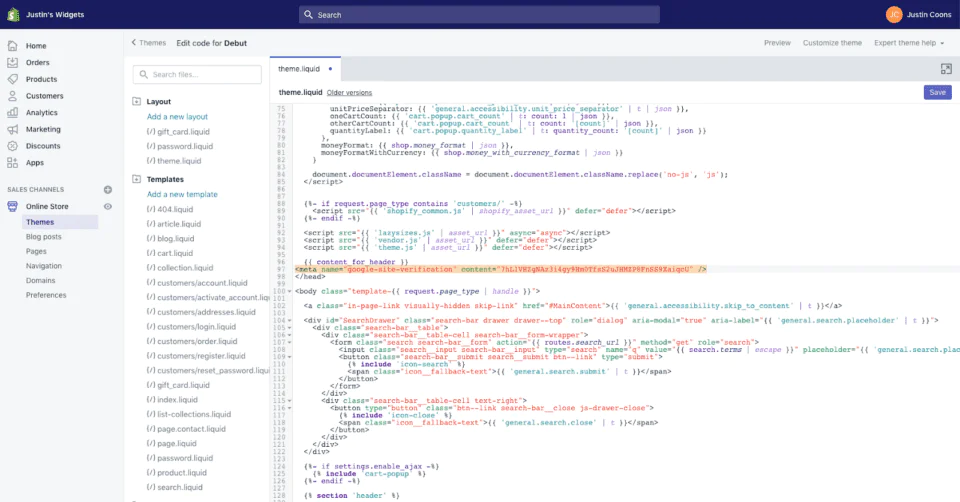
Next, click on theme.liquid in your Layout folder and scroll down to the </head> tag. Paste your Google Search Console verification code on a line right before </head>. This will add the Google Search Console verification tag sitewide in your header.
Now you can switch back to the browser tab that you left open on Google Search Console and click the “Verify” button. You’re now verified in Google Search Console.
Next, you can import your Google Search Console verification into Bing Webmaster Tools. To do this, go to https://www.bing.com/toolbox/webmaster and click “Sign Up” in the middle of the screen.
Log in using the Google account you used to verify your Search Console. You’ll see an empty dashboard that looks like this:
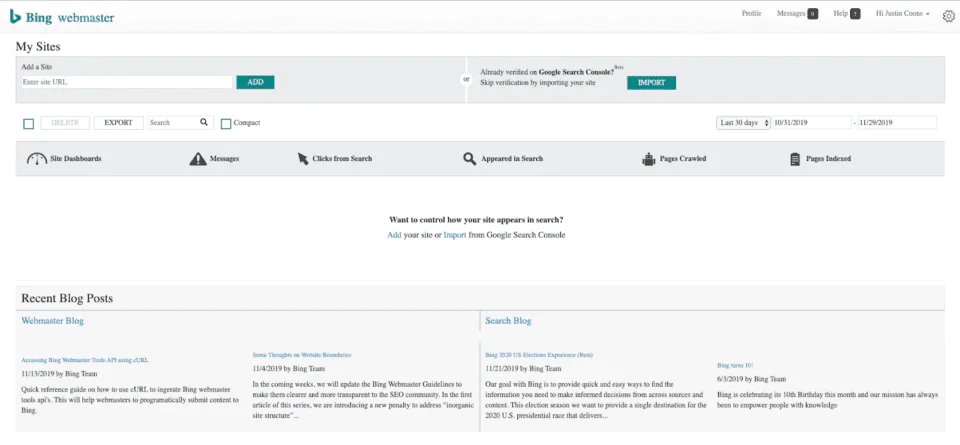
Click “import” and follow the on-screen prompts to import your Google Search Console verification into Bing. Congrats! You’re now verified in Bing Webmaster Tools.
Now that we got the boring stuff out of the way, the next item on the checklist is optimizing your Shopify store for page speed.
Most people browsing the web these days do it from mobile devices, and many are on cellular networks. As a result, Google rewards websites with fast loading pages.
There are a lot of ways to measure page speed, and for most websites, First Contentful Paint (FCP) is a good benchmark. FCP refers to the moment at which the first visual element is painted on the user’s screen.
A good FCP is usually around 2 seconds, but it’s possible to get yours under a second.
You can measure FCP using Google’s Pagespeed Insights tool, which is here: https://developers.google.com/speed/pagespeed/insights/.
When you measure your page speed on Pagespeed Insights, it produces a list of recommendations that looks something like this:
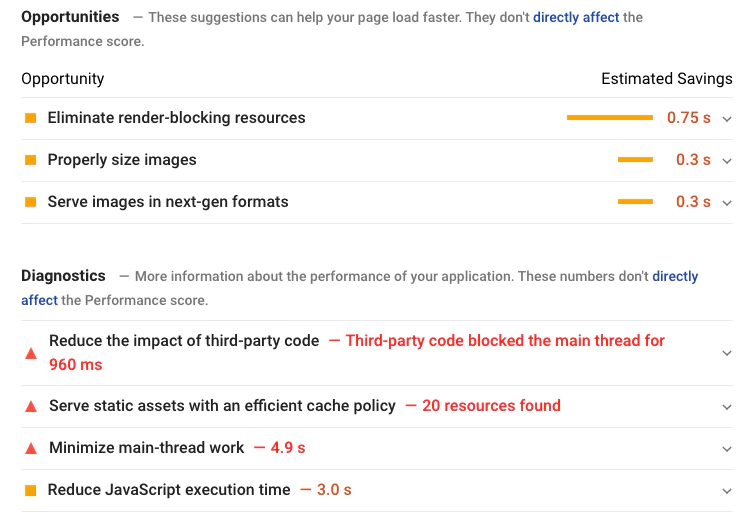
If you’re so inclined, you can use Pagespeed Insights as a “paint by numbers” for improving your load time. If it’s not for you, here are six easy ways to improve your page load times in Shopify:
As you work through this checklist, you can use Pagespeed Insights to follow improvements in your page load times.
Now that your pages are running lean and mean, the next thing to do is to make sure your collections are unique and organized efficiently.
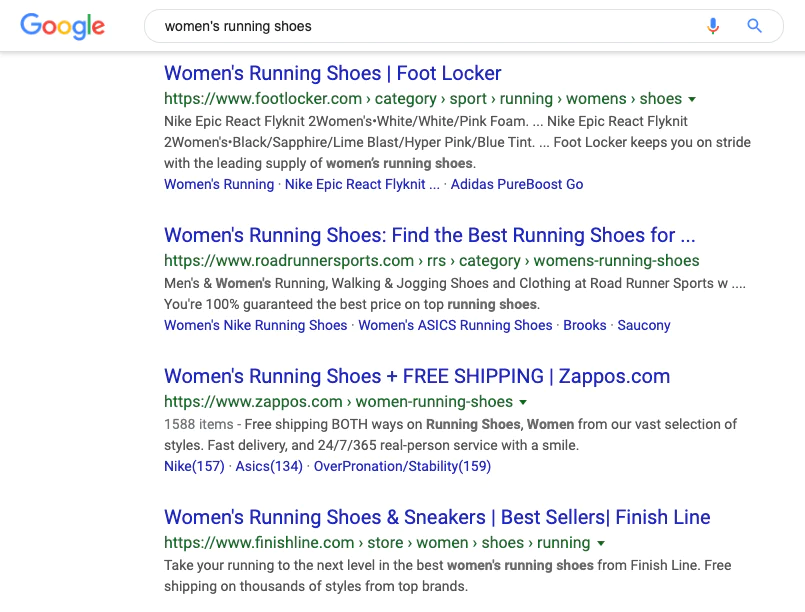
Collections pages are very valuable for SEO, and they are the most common landing pages for users searching in Google. If you search for “women’s running shoes,” you’ll notice that all of the top results in Google are collections/category pages. This is because Google doesn’t know exactly which shoe the user is looking for, so the best bet is to send the user to pages full of different models of shoes.
If you have a lot of collections pages, you’ll have a lot of possible landing pages for SEO. However, Google is very good at recognizing when collection or category pages are too duplicative of one another.
Let’s use this example:
A sporting goods shop has a category page for “running shoes” and a category page for “athletic shoes.” Each page shows 20 models of shoes, but here’s the catch: 15 of the results on the “running shoes” pages also appear on the “athletic shoes” page. Only five models are different. This merchant could have trouble with their SEO on both running shoes and athletic shoes.
Search engines are designed to crawl the web, discover new pages, and figure out what they’re about. When Google finds “athletic shoes” and “running shoes,” but it sees that both pages are more or less the same, it usually leads to one of two outcomes:
Design your collections pages for your customers. Your first priority should always be giving your customers a pleasant experience as they browse your store.
As you lay out your collections pages and assign products into them, ensure that the collections are distinct enough from each other that it wouldn’t confuse a customer looking for a certain type of product. If your collections are clear to users, then they will likely also be clear to robots.
When you’re assigning products to collections, don’t go overboard. It’s OK for products to fit into different collections, but if certain collections are more than 40% similar to other ones, they won’t do well in organic search.
Next up, let’s make sure that your product pages are unique. The web is full of people selling things, and many of them use the same old boilerplate copy to sell their products. This is particularly true for distributors who sell products from the same manufacturer.
Include well-formatted charts, lists, and copy that will help users decide on your product. If you’re selling apparel, sizing charts with exact measurements are always helpful. If you’re selling something edible, put shipping and shelf life info directly in the product description. If you’re selling motorcycle wheels, include all of the necessary tech specs.
When you do this, you’re not only helping your users; you are also helping your SEO with unique content. Need other ways to make your product pages unique?
Anything you can do to help distinguish yourself from the competition will not only help your users decide that your store is the place to shop, but it will also help your SEO.
Metadata is data that describes what is on your site. It’s on every page of your site, and it states what the title of each page is, what language it is written in, when the page was published and much more.
For SEO in Shopify, the two most important pieces of metadata are:
Let’s start with meta title tags and descriptions.
When your website appears on Google, it shows up in what we call a “snippet.” Most snippets look like this:
The bluish purplish text at the top comes from your meta title tag, and the black text at the bottom comes from your meta description.
“A good title tag should be fewer than 60 characters.”
The title needs to contain the primary keyword for each specific page (“running shoes,” “blue handmade knitted cap,” “sugar free chocolates”). Search engines use these to understand what your page is about, so if, for example, all of your pages on the site include “sugar free chocolates” in the title, we’ve now run into another duplicate content issue similar to what we described above.
Your meta description doesn’t directly influence how you rank for specific keywords, so instead, you should write your descriptions to appeal to potential users and motivate them to click. You normally get around 140 characters to write a meta description, but Google sometimes shows longer descriptions.
First, let’s write the meta title tag and descriptions for your homepage. To do this, go back to your dashboard and click “Online store > Preferences.”
Your homepage’s title tag should include your brand and a single word or theme to describe what your store is about. If you’re so inclined, you can do keyword research to ID the best possible wording for your tag.
It’s a great idea to spend some time Googling and look at the formats of title tags and meta descriptions that you like and are also performing well.
When it comes to writing title tags and meta descriptions for your collections and product pages, the best bet is usually to use an app to write them automatically. With some quick configurations upfront, apps like Smart SEO and Plug in SEO can write great title tags for you automatically.
Next, we need to ensure that your store is using “Product” schema from the Schema.org library.
This is a type of metadata—invisible to users—that passes all of the important details about your products to search engines. With this extra data, search engines will now show your products in featured placements called “Rich Snippets,” you’ll be more likely to appear in voice searches and this will satisfy a requirement for appearing in Google Merchant Center.
Similar to the title tags and meta descriptions above, the easiest way to handle this is to automate it with a plugin. Smart SEO, which we mentioned above, automatically populates structured data onto your product pages. You can also use apps like JSON-LD for SEO and Total Schema Markup.
Once your “Product” structured data has been implemented, you can verify that everything works correctly on Google’s Structured Data Testing Tool. If everything passes validation without any errors, your schema will be seen.
If you’ve followed all of the steps in the checklist so far, you should see an improvement in SEO from what marketers like to call the “bottom of the funnel.”
The bottom of the funnel are users who are already familiar with the product you sell and have now reached the point where they’re almost ready to buy. All of the optimizations we’ve done—improving page speed, putting unique helpful content on product pages, making collections easier to browse—should improve the user’s experience on your site, boost their trust in you and make them more likely to buy.
But what about the “top of the funnel?” That’s a way to grow your audience even more.
For example, the running shoes retailer we mentioned above could blog about “Couch to 5K” workouts or the best shoes for runners with knee pain. The users that land on these articles from Google aren’t exactly looking to buy a shoe at that moment, but they’ve now been exposed to the retailer’s brand, and they might come back when it’s time to buy a new pair of shoes.
An added bonus is that people link to helpful blogs from their own blogs. Those links, in turn, boost the overall SEO of your site. The more links you get, the more competitive you’ll be in SEO.
However, blogging isn’t for everyone. It’s much more important to produce well written, helpful blogs than to write as many blog posts as possible. Quality beats quantity.
It can be a significant time investment to regularly produce high quality, unique blogs. Only get involved with blogging if it makes sense for your business, but if you do, stick with it. It won’t produce returns right away, but it will help bolster your store’s marketing in the long run.
One of the really nice things about digital marketing is that all of your efforts are complementary of one another.
In other words, time spent on SEO will pay dividends in your other marketing channels.
Collections pages and product pages that are well optimized for SEO usually do well in AdWords. If you are producing great content on your blog, you can share it and use it for audience building on social media.
You’ll also find that all of these efforts benefit your email marketing, which is a must-have for any Shopify store. Running an active email marketing program will allow you to communicate directly with your customers and reactivate them when the time is right.
SendGrid marketing campaigns easily integrates with Shopify. We’ve got an easy to use interface that allows you to make meaningful connections with your customers, without having to spend the whole day designing emails. You can give it a try for free.
SendGrid helps you focus on your business without the cost and complexity of owning and maintaining an email infrastructure. And with a full-featured marketing email service that offers a flexible workflow, powerful list segmentation, and actionable analytics, all of your email needs are met in one simple platform.