Sending Emails from Python Flask Applications With Twilio SendGrid


June 29, 2020
Written by
SendGrid Team
Contributor
Opinions expressed by Twilio contributors are their own

Sending Emails from Python Flask Applications With Twilio SendGrid

Determining whether to build or buy your email infrastructure is no small decision. Do you have the bandwidth to support deliverability issues? Will you be able to keep up with your sending as you grow? What’s more cost effective? While there are a number of factors to consider, that’s a conversation for another guide (like this Build it or Buy It guide). 

Instead, this tutorial will show you how easy it is to send email via a dedicated email service. We’ll walk through how to deliver email through Twilio SendGrid using the Flask framework and the Flask-Mail extension. 

Tutorial tools

To follow this tutorial you need the following items:
  • Python 3.6 or newer. If your operating system does not provide a Python 3.6+ interpreter, you can go to python.org to download an installer.
  • A free Twilio SendGrid account. If you are new to Twilio SendGrid, sign up for a trial account. With a trial account, you can send 40,000 emails for 30 days, then 100 emails per day forever.

Getting set up with SendGrid

Before you can send email through SendGrid, you have to create an API key that you will use to authenticate access to SendGrid services. Log in to your SendGrid account, then click on the left sidebar select “Settings” and then API Keys. Click “Create API Key."

API key
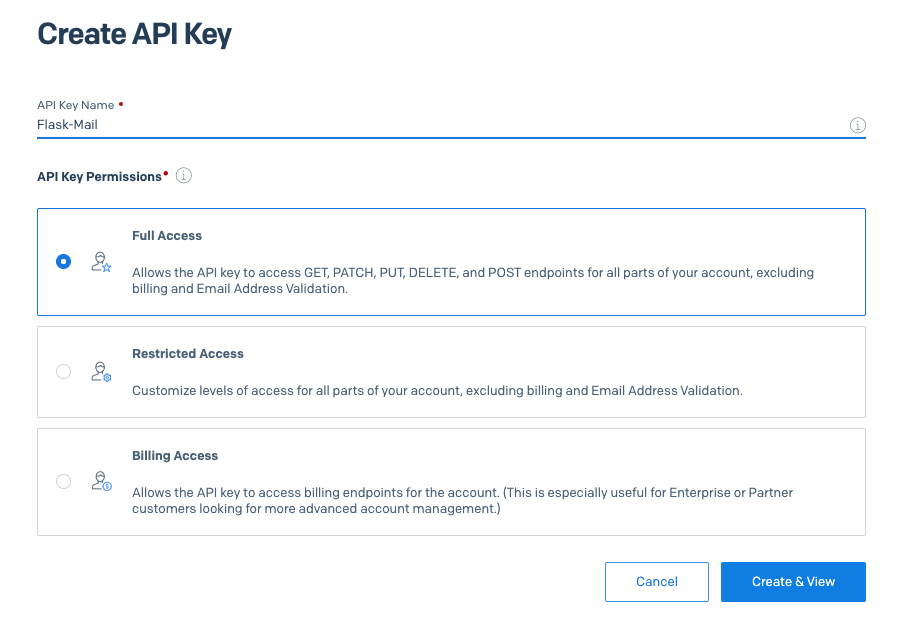
Give your API key a friendly name (keep it simple and straightforward so you remember what it refers to!). For this tutorial, we chose the name Flask-Mail. We selected “Full Access” for permissions, which gives the key the ability to perform all the necessary email sending functions (access to GET, PATCH, PUT, DELETE, and POST endpoints). If you prefer to create a key that has very specific permissions, then select “Restricted Access” and configure your access as needed.

When you click the “Create & View” button you will be presented with your key. This key will never be shown again, so you need to click on it to copy it to the clipboard. Then paste it in a secure document so that you can use it later. If you lose your key, you will need to generate a brand new one. Once you have saved your key, you can click the “Done” button.

Building a Python environment

Now that we have the setup complete, we can dive into how to send email from Python Flask applications. We’ll begin by making a new directory on your computer called *twilio-sendgrid-tests* (or something similar), and then creating a new Python virtual environment within it. 

For Mac and Unix users, the commands are:


For Windows users, the commands are:


Next, install Flask, Flask-Mail and python-dotenv in your virtual environment:

Setting up a Flask application

Let’s build a starter Flask and Flask-Mail application in file app.py:


Here you can see how to properly configure Flask-Mail to use SendGrid’s SMTP service. The important settings are:
  • The mail server should be `smtp.sendgrid.net`.
  • The mail port should be 587. (Do you know which ports to use when? Check out this blog post.)
  • TLS must be enabled. (What’s the difference between SSL and TLS?)
  • Authentication is required. For the username, you must use `apikey` (this is the same for all SendGrid accounts). The password is the SendGrid API key that you created in the previous section.
For this Flask application, we added the above settings in the proper configuration keys for the Flask-Mail extension. For security reasons, we imported the API key from an environment variable named `SENDGRID_API_KEY`. We also set a default sender email address from an environment variable. This is the email address that will appear in the “from” field of all emails by default.

Create a .env file with the two required variables:


Flask will automatically import the variables defined in the .env file (as long as you have the python-dotenv package installed), so this is enough to get these two variables into the Flask application configuration.

Sending a test email

Let’s see how you can send yourself a test email from the Python shell:


Note that we started the Python shell with the `flask shell` command. This will ensure that the Flask application we built in app.py is imported.

Once in the shell, import the `mail` instance we created in app.py and the `Message` class from Flask-Mail:


Next create a `Message` instance:


The last step is to send this email:


And that’s it! If everything goes according to plan, the email should arrive in your inbox in just a few seconds.

If you want to see a Flask route example that integrates this functionality, here is a simple one you can add at the bottom of app.py:


To complete the example application, you need to add the index.html template file. First create a directory for your templates:


And then write the following content in file templates/index.html:


Run the test application with:


Then navigate to http://localhost:5000 in your web browser to access the application.


You can now enter a recipient email address and when you click the button a test email will be sent to that address.

Troubleshooting delivery issues

By using the Flask application above, you should be successful in sending emails. There is a chance, however, that your emails will fail to deliver. Since SendGrid sends emails asynchronously, most delivery errors occur after the sender completes their side of the transaction, so your application will not have any indication that there has been an error. If this happens, then it is likely that the email was rejected by the recipient’s email server.

Luckily, if you experience this by sending an email as we’ve described, you can use the Twilio SendGrid dashboard to help you debug what happened. From the SendGrid dashboard, click on Activity, and then on the “Show All Activity” button in the middle of the page. This will show you a list of all the emails that you attempted to send, indicating if they were successfully delivered or not.


You can see in the picture above that an email that was sent to an example.com address failed to deliver. For any emails that were not delivered, you can click on the email to see detailed information, including any error responses sent by the recipient’s email server.

Once you determine why your emails aren’t sending, there are a number of ways to go about solving those delivery issues. If you see a number of spelling mistakes in the emails (e.g. @yaho.com or @gmal.com) it might be worth exploring an Email Validation tool to catch any common spelling errors in your email contact list. 

There are many other issues that can lead to failed delivery, including a poor sending reputation or blocked IP address. Learn all about email deliverability in our 2020 Email Deliverability Guide.

Conclusion

As you can see from the tutorial, Twilio SendGrid easily integrates into the start Flask email sending workflow, making sending email a simple task. 

If you’re now wondering how you receive emails from the Flask Framework in Python, not to worry, we have you covered! Check out this article: How to Receive Emails with the Flask Framework for Python.

And, for more resources on how to integrate with Twilio SendGrid or send via our APIs, check out our Knowledge Center.

Recommended For You


Most Popular


Send With Confidence

Partner with the email service trusted by developers and marketers for time-savings, scalability, and delivery expertise.