How to Receive Emails with the Flask Framework for Python


April 29, 2020
Written by
SendGrid Team
Contributor
Opinions expressed by Twilio contributors are their own

How to Receive Emails with the Flask Framework for Python

While there are plenty of tutorials on the Internet about sending emails, there is very little on how to configure an application to receive them and process them. This is a task that can be incredibly difficult if you are trying to set everything up by yourself, but it is as easy as receiving a web request when using Twilio SendGrid’s Inbound Parse feature.

In this short tutorial you are going to learn how to have Twilio SendGrid forward your emails directly to your web application, using Python and the Flask web framework.

Requirements

These are the requirements to complete this tutorial:
  • Python 3: If your operating system does not provide a Python 3 interpreter, you can go to python.org to download an installer.
  • A Twilio SendGrid account: If you are new to Twilio SendGrid you can create a free account, which allows you to send 100 emails per day forever.
  • A domain on which you will receive emails: Throughout this article, I’m going to use yourdomainhere.com. You will need to replace it with your own domain name.
  • ngrok: We will use this handy utility to connect the Flask application running locally on your computer to a public URL that SendGrid can send requests to. This is necessary for the development version of the application because your computer is likely behind a router or firewall, so it isn’t directly reachable on the Internet. If you don’t have ngrok installed, you can download a copy for Windows, MacOS, or Linux.

Domain authentication

Before Twilio SendGrid can accept emails on your domain you have to authenticate it, so that Twilio SendGrid knows the domain is under your control.

Initiate domain authentication

To authenticate your domain, log in to your SendGrid account, and in the left-side navigation bar open “Settings” to then select Sender Authentication.


In the Sender Authentication page click the “Get Started” button in the “Domain Authentication” section.

sender authentication page

You will be asked to select your DNS provider, which in most cases is the same company from which you purchased your domain. If your DNS provider does not appear on the list, or if you don’t know who they are, just select “I’m Not Sure.”

You will then be asked about adding branding to links that appear in outgoing emails. This isn’t a topic we are concerned with at this time, so select “No.” You can enable this option at a later time if you want to use it.

Click the “Next” button to continue on to the next page.

authenticate your domain page

In the following page you will be asked to provide your domain name. I entered yourdomainhere.com, and you will need to enter the domain that you intend to use. You do not need to change anything in the “Advanced Settings” section.

Click the “Next” button to proceed.


The page will now display 3 new DNS records that you need to add to your domain configuration, each with a type, a hostname, and a value. For your convenience, the host and values can all be copied to the clipboard. Below you can see the settings that I was given. Yours are going to be similar, but with your own domain name in them:

Adding DNS entries to your domain

The next step is going to be different depending on your DNS provider. Visit your domain’s configuration page and find where the DNS settings are edited.

The screenshots below are for Google Domains. You can see how I added the first of the three DNS records in the following image. Note that the 3 records with names @, ftp, and www records are unrelated to this tutorial and were already set on my domain.


Be careful about how you enter the DNS record name. While some providers expect a fully qualified name for your DNS records, as shown by SendGrid, others expect just the portion before the domain name. For example, the record that SendGrid showed as em3329.yourdomainhere.com had to be entered as em3329 on Google Domains. Check your other DNS records and be consistent in how you enter these new ones.

Here is how the 3 new DNS records looked after I entered them:

Domain verification

Now go back to the SendGrid Sender Authentication page, where your domain is going to appear as pending. Click on it to proceed with the authentication process.

In the next screen, you will see the 3 DNS records. Click the “Verify” button on the top right of the page to have SendGrid pull your DNS records and confirm that you have added the requested entries.


If SendGrid is able to verify your domain, you will get a “It worked!” page:


If, on the other hand, SendGrid cannot verify your DNS entries, you will need to try again later. Every time DNS changes are made it takes some amount of time for the changes to propagate across DNS servers. A failure right after editing your DNS entries just means that you need to give it a bit more time before you hit the “Verify” button again. Note that it can take up to 48 hours for DNS to fully propagate, though it usually takes a lot less time.

Once you get the “It worked!” page you are well on your way to get emails posted to your Flask web application.

A Flask email application

Now we are ready to write a simple Flask web application where SendGrid can forward our emails.

Create a Python Virtual Environment

Following Python best practices, we are going to make a separate directory for our project, and inside it we are going to create a virtual environment. We then are going to install the Flask framework on it.

If you are using a Unix or Mac OS system, open a terminal and enter the following commands to do the tasks described above:


If you are following the tutorial on Windows, enter the following commands in a command prompt window:

An incoming email route

Let’s now write a Flask application that will receive incoming emails. The code for the complete application is shown below. Put this code in a file named app.py.


The application has just one web route connected to the /email URL. We will have SendGrid invoke this route to pass incoming emails to us. The request that they send will have all the details related to the email sent as a standard HTTP form post. This means that from Flask we can easily access all these details from the `request.form` dictionary.

The following form variables are of particular interest:
  • `request.form['from']`: the sender of the email
  • `request.form['to']`: the recipient(s) of the email
  • `request.form['subject']`: the email subject
  • `request.form['text']` the email body in plaintext format
  • `request.form[‘html’]` the email body in HTML format
Note that these are not the only fields submitted by SendGrid. Review the complete list of email parameters in the SendGrid documentation.

Since processing emails is largely dependent on each application, for the example Flask application, all we are doing is printing the email fields to the console.

After you save app.py you can start the Flask application as follows:


The application is now running and listening for incoming requests, but it is only reachable from your own computer. Leave the application running on your terminal window for now. In the next section we will expose it to the Internet.

The SendGrid Inbound Parse webhook

The last of this tutorial is to configure SendGrid to forward incoming emails on your domain to the Flask application.

Starting ngrok

The ngrok tool creates a publicly available URL and maps it to a locally running application. This is a common technique used to expose services on the Internet for development and testing. Once your Flask application is complete you will deploy it for production on a proper server and this will not be necessary anymore.

If you haven’t yet, install ngrok on your system. Leave the Flask application running and open a second terminal window to start ngrok as follows:


This is telling ngrok to create a “tunnel” from the public Internet into port 5000 in our local machine, where the Flask application is waiting for web requests. The output of ngrok is going to look as follows:

ngrok

Note the lines beginning with “Forwarding” in the ngrok screen. These show a randomly generated public URL that ngrok uses to redirect requests into our service. We are going to use the https:// URL because it uses encryption.

Registering the webhook URL with SendGrid

Go back to the SendGrid dashboard and under Settings select Inbound Parse, then click on “Add Host & URL.”

inbound parse page

In the next page enter the subdomain on which you will be receiving emails. This can be any subdomain that is not yet in use on your domain, or if you prefer to receive emails directly on your top-level domain, it can just be left empty. In the image below, I used the subdomain parse, which means that emails that are accepted by SendGrid will have the format <anything>@parse.yourdomainhere.com. Leaving the subdomain field empty will allow SendGrid to accept emails for <anything>@yourdomainhere.com, which in some cases may be preferable.

Next you have to select your domain name. This is a dropdown list that shows all the domains that you have verified with SendGrid. If you are doing this for the first time you will only see the domain that you verified earlier.

The following field is for the destination URL for your webhook. This is the URL generated by ngrok appended with the Flask URL /email. In my case this was https://bbf1b72b.ngrok.io/email. You will have a similar URL, but the first part of the ngrok hostname is going to be different.

Click “Add” to configure your webhook.


Now you will see an entry for your webhook in the main Inbound Parse page:


Note: ngrok URLs change each time ngrok is stopped and restarted, so during development you will need to edit your webhook to update the URL every time you restart ngrok. When you deploy your webhook for production use you will host it directly on a public URL, so ngrok will not be used.

Registering the parse subdomain

The subdomain that you selected to receive emails in the previous section needs to be defined in your domain’s DNS configuration with a `MX` record. The value for this record is the same for all SendGrid customers: `mx.sendgrid.net.` (note the trailing dot after “net”).

In my Google Domains DNS configuration, I defined my parse subdomain as follows:


Recall that depending on what domain provider you use, you may need to enter the complete hostname for this DNS record, so in that case it would be parse.yourdomainhere.com.

If you decided to not define a subdomain in the previous section, then your hostname is going to be yourdomainhere.com, which for some DNS providers must be given as “@".

Remember that this DNS change will also need to propagate, so you may not be able to receive emails immediately.

Sending a test email

While your Flask application and ngrok are both running, open your email client and send a test email. In the “To:” field you can enter any username that you want, as SendGrid captures all usernames. What goes after the @ needs to be your complete email receiving domain.

In the example below I sent an email to test@parse.yourdomainhere.com:

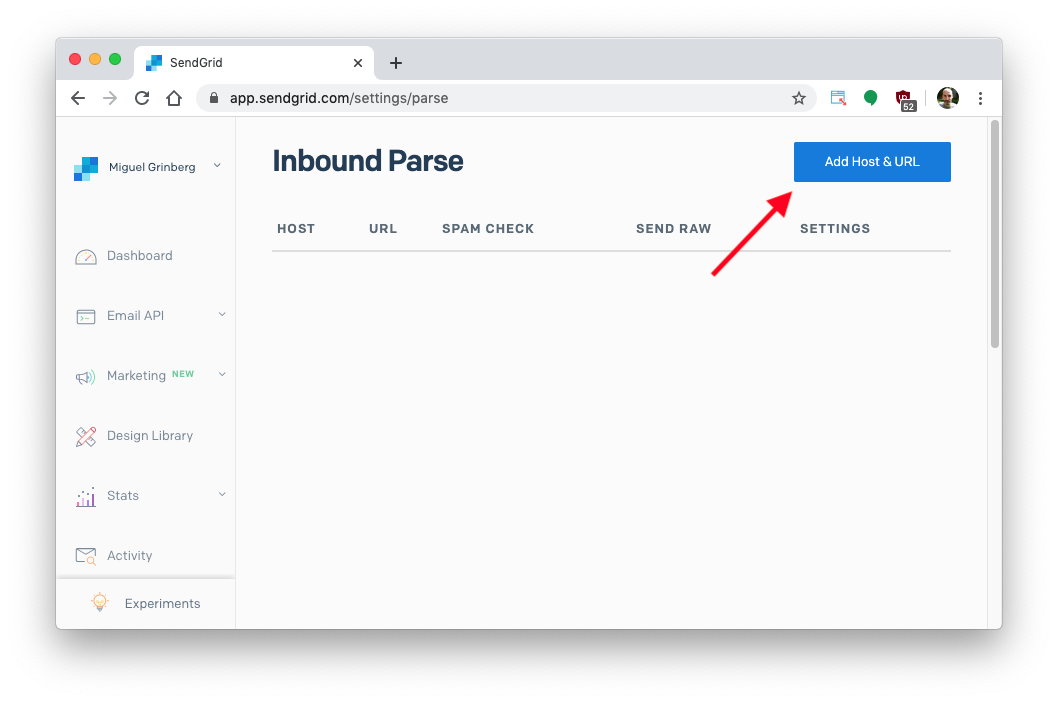
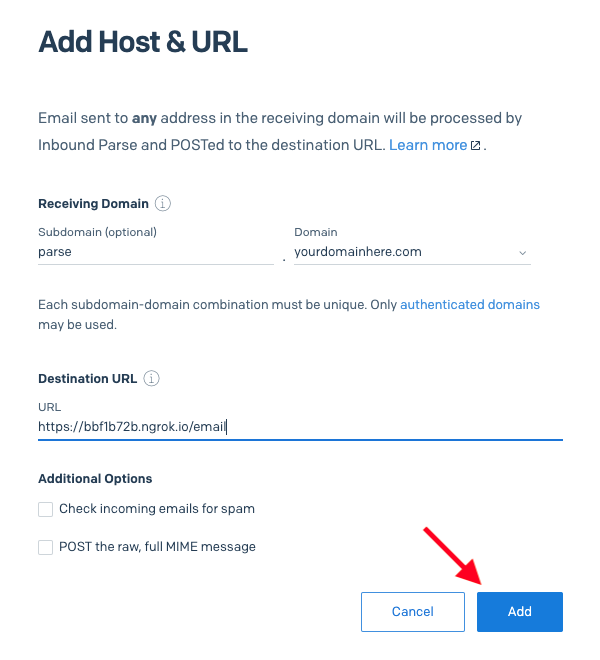
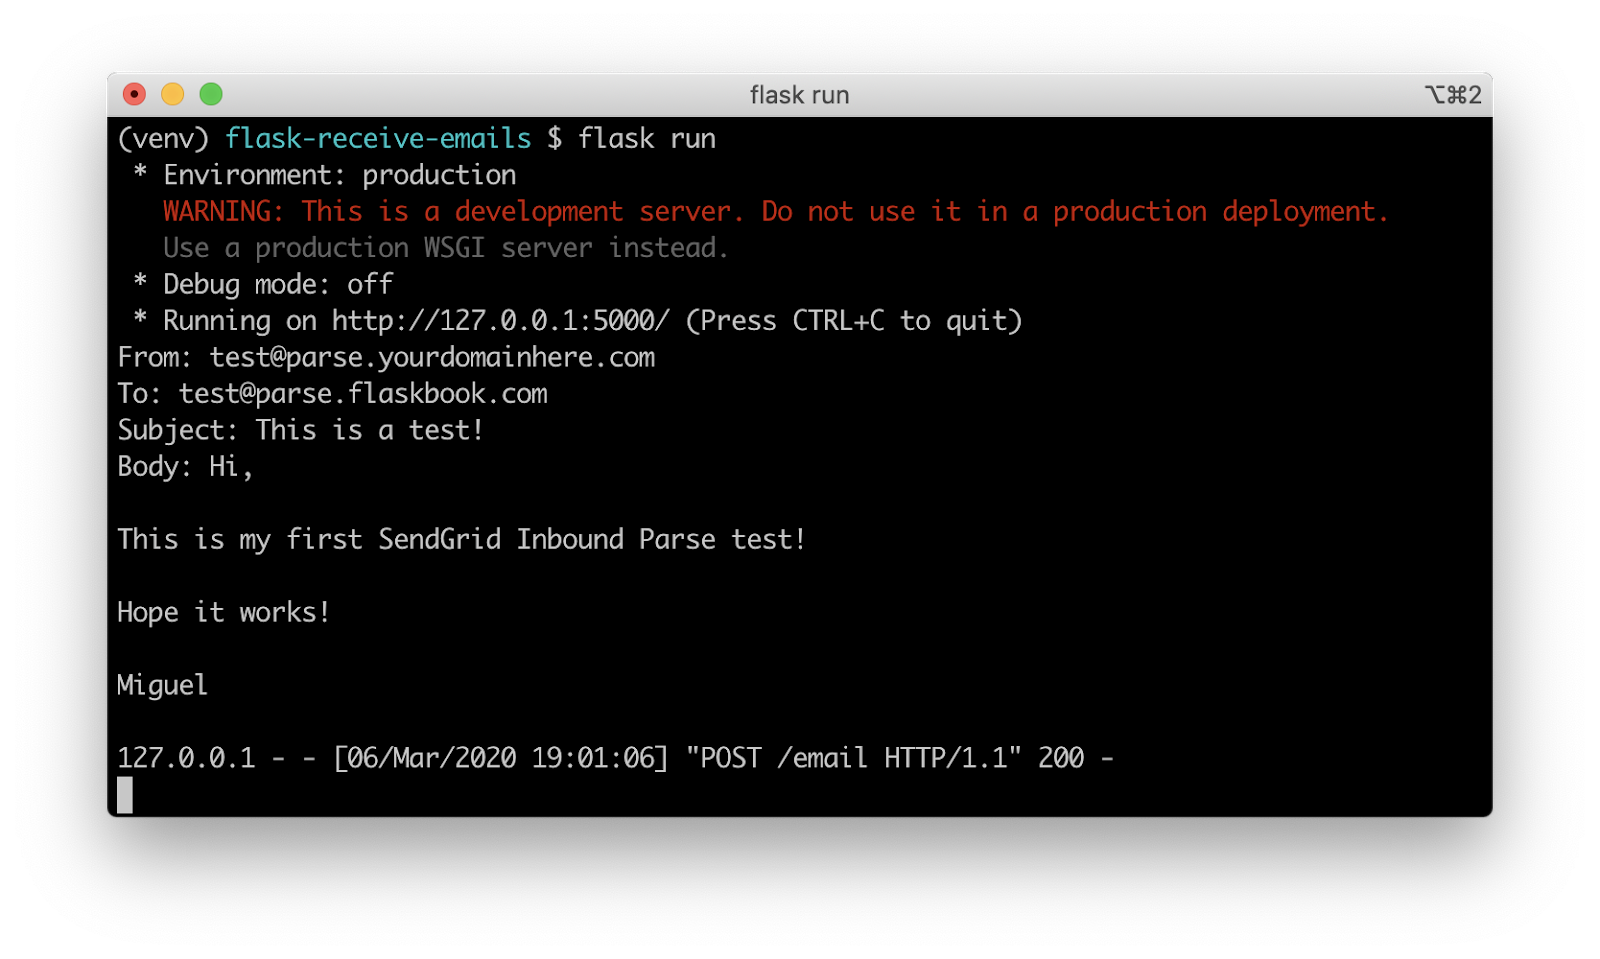
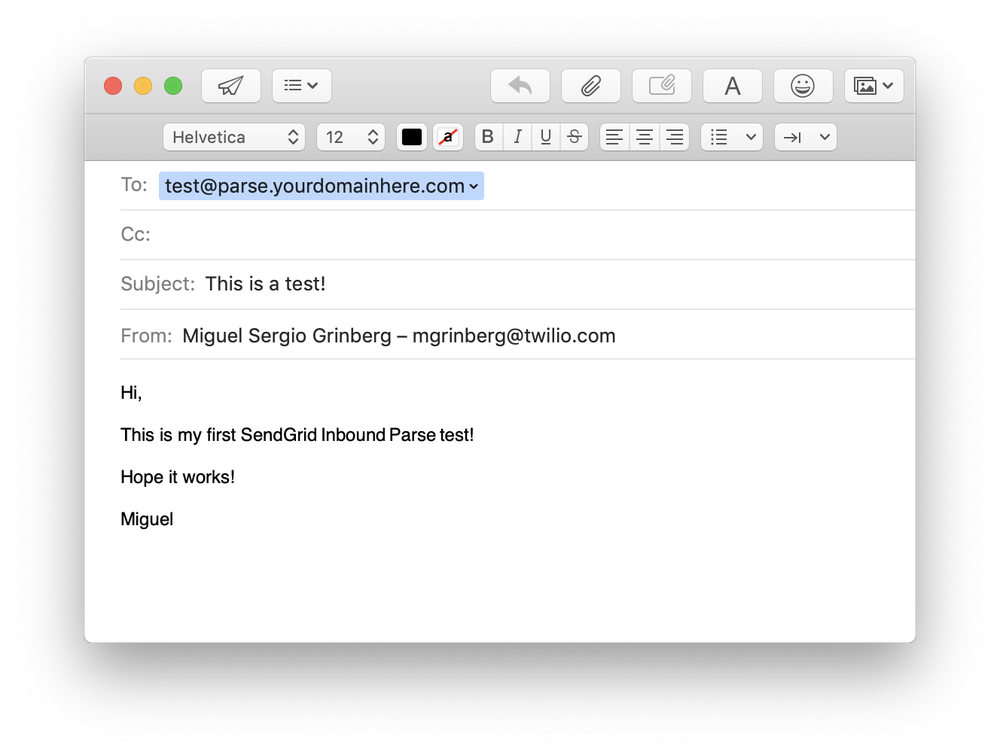
Wait a minute or two for SendGrid to receive the email and forward it to the ngrok webhook URL, which in turn will pass it on to the Flask’s /email endpoint. As you’ve seen above, the simple endpoint that I wrote in the Flask application prints the email data received to the console:

Flask application prints email data

So this is it, we are now receiving emails as web requests in our Flask application!

Production deployment

In this section, I want to point out a couple of important differences between webhooks deployed during development and those intended for production use.

Deployments without ngrok

As mentioned above, ngrok is not a production tool and should never be used in a production deployment. Instead you will deploy your Flask application on a server that is directly connected to the Internet. There are several deployment options discussed in the Flask documentation.

Webhook security

Consider that your email receiving endpoint is available publicly on the Internet, so anyone who knows the URL can send a request to it, potentially exposing your application to spurious invocations sent by malicious users pretending to be SendGrid requests.

A good measure to prevent this type of attack is to implement Basic Authentication on your Flask endpoint. The Flask-HTTPAuth extension can be helpful in implementing this type of security.

If you add authentication to your endpoint, you then need to include the username and password in the webhook URL given to SendGrid. The webhook that I used above would have to be given as https://username:password@bbf1b72b.ngrok.io/email.

Conclusion

Even though there are a lot of steps involved in setting everything up to receive emails, this is one of the simplest ways to achieve it. For more information on Inbound Parse, check out our docs page

We can’t wait to see what you build with Inbound Parse!

Recommended For You


Most Popular


Send With Confidence

Partner with the email service trusted by developers and marketers for time-savings, scalability, and delivery expertise.