An E2E Testing Journey Part 1: STUI to WebdriverIO


November 20, 2019
Written by
Contributor
Opinions expressed by Twilio contributors are their own

An E2E Testing Journey Part 1: STUI to WebdriverIO

Note: This is a post from #frontend@twiliosendgrid. For other engineering posts, head over to the technical blog roll

As SendGrid’s frontend architecture started to mature across our web applications, we wanted to add another level of testing in addition to our usual unit and integration test layer. We sought to build new pages and features with E2E (end-to-end) test coverage with browser automation tools.

We desired to automate testing from a customer’s perspective and to avoid manual regression tests where possible for any big changes that may occur to any part of the stack. We had, and still have, the following goal: provide a way to write consistent, debuggable, maintainable, and valuable E2E automation tests for our frontend applications and integrate with CICD (continuous integration and continuous deployment).

We experimented with multiple technical approaches until we finalized on our ideal solution for E2E testing. On a high-level, this sums up our journey:

This blog post is one of two parts documenting and highlighting our experiences, lessons learned, and tradeoffs with each of the approaches used along the way to hopefully guide you and other developers into how to hook up E2E tests with helpful patterns and testing strategies.

Part one encompasses our early struggles with STUI, how we migrated to WebdriverIO, and yet still experienced a lot of similar downfalls to STUI. We will go over how we wrote tests with WebdriverIO, Dockerized the tests to run in a container, and eventually integrated the tests with Buildkite, our CICD provider.

If you would like to skip ahead to where we are at with E2E testing today, please go on ahead to part two as it goes through our final migration from STUI and WebdriverIO to Cypress and how we set it up across different teams.

TLDR: We experienced similar pains and struggles with both Selenium wrapper solutions, STUI and WebdriverIO, that we eventually started to look for alternatives in Cypress. We learned a bunch of insightful lessons to tackle writing E2E tests and integrating with Docker and Buildkite.

First Foray into E2E Testing: SiteTestUI aka STUI

When initially seeking out a browser automation tool, our SDETs (software development engineers in test) dove into making our own custom in-house solution built with Ruby and Selenium, specifically Rspec and a custom Selenium framework called Gridium. We valued its cross-browser support, ability to configure our own custom integrations with TestRail for our QA (Quality Assurance) engineer test cases, and the thought of building the ideal repo for all frontend teams to write E2E tests in one location and to be run on a schedule.

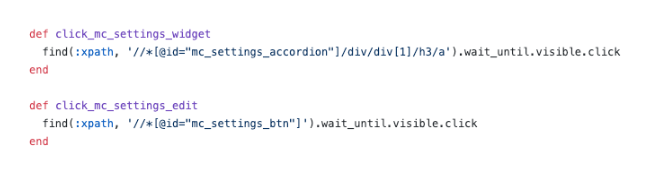
As a frontend developer eager to write some E2E tests for the first time with the tools the SDETs built for us, we started to implement tests for the pages we already released and pondered how to properly set up users and seed data to focus on parts of the feature we wanted to test. We learned some great things along the way like forming page objects for organizing helper functionality and selectors of elements we wish to interact with by page and started to form specs that followed this structure:


We gradually built up substantial test suites across different teams in the same repo following similar patterns, but we soon experienced many frustrations that would slow down our progress immensely for new developers and consistent contributors to STUI such as:
  • Getting up and running required considerable time and effort to install all the browser drivers, Ruby Gem dependencies, and correct versions before even running the test suites. We sometimes had to figure out why the tests would run on one’s machine versus another person’s machine and how their setups differ.
  • Test suites proliferated and ran for hours until completion. Since all the teams contributed to the same repo, running all the tests serially meant waiting for several hours for the overall test suite to run and multiple teams pushing new code potentially led to another broken test somewhere else.
  • We grew frustrated with flaky CSS selectors and complicated XPath selectors. This picture below explains enough how using XPath can make things more complicated and these were some of the simpler ones.
  • Debugging tests was painful. We had trouble debugging vague error outputs and we usually had no idea where and how things failed. We could only repeatedly run the tests and observe the browser to deduce where it possibly failed and which code was responsible for it. When a test failed in a Docker environment in CICD without much to look at other than the console outputs, we struggled to reproduce locally and to solve the issue.
  • We encountered Selenium bugs and slowness. Tests ran slowly due to all the requests being sent from the server to the browser and at times our tests would crash altogether when attempting to select many elements on the page or for unknown reasons during test runs.
  • More time was spent fixing and skipping tests and broken scheduled build test runs began to be ignored. The tests did not provide value in actually signifying true errors in the system.
  • Our frontend teams felt disconnected from the E2E tests as it existed in a separate repo from the respective web application ones. We often needed to have both repos open at the same time and continue to look back and forth between codebases in addition to browser tabs when the tests ran.
  • Frontend teams did not like context switching from writing code in JavaScript or TypeScript on the daily to Ruby and having to relearn how to write tests whenever contributing to STUI.
  • Since it was a first take for a lot of us when contributing to the test, we fell into a lot of antipatterns like building up state through the UI for logging in, not doing enough teardown or setup through the API, and not having enough documentation to follow for what makes a great test.
Despite our progress towards writing a considerable number of E2E tests for many different teams in one repo, and learning some helpful patterns to take with us, we experienced headaches with the overall developer experience, multiple points of failure, and lack of valuable, stable tests to verify our whole stack.

We valued a way to empower other frontend developers and QAs to build their own stable E2E testing suites with JavaScript that resides with their own application code to promote reuse, proximity, and ownership of the tests. This led us to probe into WebdriverIO, a JavaScript-based Selenium framework for browser automation tests, as our initial replacement for STUI, the custom Ruby Selenium in-house solution.

We would later experience its downfalls and eventually move onto Cypress (fast forward to Part 2 here if WebdriverIO stuff does not appeal to you), but we gained invaluable experience with establishing standardized infrastructure in each team’s repo, integrating E2E tests into CICD for our frontend teams, and adopting technical patterns worth documenting about in our journey and for others to learn about who may be about to jump into WebdriverIO or any other E2E testing solution.

Switching from STUI to WebdriverIO


When embarking on WebdriverIO to hopefully alleviate the frustrations we experienced, we experimented by having each frontend team convert their existing automation tests written with the Ruby Selenium approach to WebdriverIO tests in JavaScript or TypeScript and compare stability, speed, developer experience, and overall maintenance of the tests.

In order to achieve our ideal set up of having E2E tests residing in the frontend teams’ application repos and running in both CICD and scheduled pipelines, we recapped the following steps that generally apply to any team wishing to onboard an E2E testing framework with similar goals:
  1. Installing and choosing dependencies to hook up with the testing framework
  2. Establishing environment configs and script commands
  3. Implementing E2E tests that pass locally against different environments
  4. Dockerizing the tests
  5. Integrating Dockerized tests with CICD provider

Step 1: Deciding on Dependencies for WebdriverIO

WebdriverIO provides developers with the flexibility to pick and choose among many frameworks, reporters, and services to start the test runner against. This required lots of tinkering and research for the teams to settle on certain libraries to get started.

Since WebdriverIO is not prescriptive about what to use, it opened the door for frontend teams to have varying libraries and configurations, though the overall core tests would be consistent in using the WebdriverIO API.

We opted to let each of the frontend teams customize based on their preferences and we typically landed on using Mocha as the test framework, Mochawesome as the reporter, the Selenium Standalone service, and Typescript support. We chose Mocha and Mochawesome due to our teams’ familiarity and prior experience with Mocha before, but other teams decided to use other alternatives as well.

Step 2: Environment Configs and Scripts

After deciding on the WebdriverIO infrastructure, we needed a way for our WebdriverIO tests to run with varying settings for each environment. Here is a list illustrating most of the use cases of how we wanted to execute these tests and why we desired to support them:
  • Against a Webpack dev server running on localhost (i.e. http://localhost:8000) and that dev server would be pointed to a certain environment API like testing or staging (i.e. https://testing.api.com or https://staging.api.com). Why? Sometimes we need to make changes to our local web app such as adding more specific selectors for our tests to interact with the elements in a more robust way or we were in progress of developing a new feature and needed to adjust and validate the existing automation tests would pass locally against our new code changes. Whenever the application code changed and we did not push up to the deployed environment yet, we used this command to run our tests against our local web app.
  • Against a deployed app for a certain environment (i.e. https://testing.app.com or https://staging.app.com) like testing or staging Why? Other times the application code does not change but we may have to alter our test code to fix some flakiness or we feel confident enough to add or delete tests altogether without making any frontend changes. We utilized this command heavily to update or debug tests locally against the deployed app to simulate more closely how our tests run in CICD pipelines.
  • Running in a Docker container against a deployed app for a certain environment like testing or staging Why? This is meant for CICD pipelines so we can trigger E2E tests to be run in a Docker container against for example the staging deployed app and make sure they pass before deploying code to production or in scheduled test runs in a dedicated pipeline. When setting up these commands initially, we performed a lot of trial and error to spin up Docker containers with different environment variable values and test to see the proper tests executed successfully before hooking it up with our CICD provider, Buildkite.
To accomplish this, we set up a general base config file with shared properties and many environment specific files such that each environment config file would merge with the base file and overwrite or add properties as demanded to run. We could have had one file for each environment without the need for a base file, but that would lead to a lot of duplication in common settings. We opted to use a library like deepmerge to handle it for us, but it is important to note that merging is not always perfect with nested objects or arrays. Always double check the resulting output configs as it may lead to undefined behavior when there are duplicate properties that did not merge correctly.

We formed a common base config file, wdio.conf.js, like this:


To fit our first major use case of running E2E tests against a local webpack dev server pointed to an environment API, we generated the localhost config file, wdio.localhost.conf.js, by the following:


Notice we merged the base file and added the localhost specific properties to the file to make it more compact and easier to maintain. We also use the Selenium Standalone service to spin up different types of browsers aka capabilities.

For the second use case of running E2E tests against a deployed web app, we set up the testing and staging app config files, `wdio.testing.conf.js` and wdio.staging.conf.js, similar to this:


Here we added some extra environment variables to the config files like login credentials to dedicated users on staging and updated the `baseUrl` to point to the deployed staging app URL.

For the third use case of running E2E tests in a Docker container against a deployed web app within the realm of our CICD provider, we set up the CICD config files, wdio.cicd.testing.conf.js and wdio.cicd.staging.conf.js, like so:


Notice how we do not use the Selenium Standalone service anymore as we will later install the Selenium Chrome, Selenium Hub, and application code in separate services in a Docker Compose file. This config also exhibits the same environment variables as the staging config such as the login credentials and `baseUrl` since we expect to run our tests against the deployed staging app, and the only difference is that these tests are intended to execute within a Docker container.

With these environment config files established, we outlined package.json script commands that would serve as the foundation for our testing. For this example, we prefixed the commands with “uitest” to denote UI tests with WebdriverIO and because we also ended test files with *.uitest.js. Here are some sample commands for the staging environment:

Step 3: Implementing E2E Tests Locally

With all the test commands at hand, we scoped out tests in our STUI repo for us to convert over to WebdriverIO tests. We focused on small to medium-sized page tests and began to apply the page object pattern to encapsulate all the UI for each page in an organized manner.

We could have structured files with a bunch of helper functions or object literals or any other strategy, but the key was to have a consistent way to deliver maintainable tests quickly and stick with it. If the UI flow or DOM elements changed for a specific page, we only needed to refactor the page object related to it and possibly the test code to get tests passing again.

We implemented the page object pattern by having a base page object with shared functionality from which all other page objects would extend from. We had functions like open to provide a consistent API across all of our page objects to “open” up or visit a page’s URL in the browser. It resembled something like this:


Implementing the specific page objects followed the same pattern of extending from the base Page class and adding the selectors to certain elements we wished to interact with or assert upon and helper functions to perform actions on the page.


Notice how we used the base class open through super.open(...) with the page’s specific route so we can visit the page with this call, SomePage.open(). We also exported the class already initialized so we can reference the elements like SomePage.submitButton or SomePage.tableRows and interact with or assert upon those elements with WebdriverIO commands. If the page object was meant to be shared and initialized with its own member properties in a constructor, we could also export the class directly and instantiate the page object in the test files with new SomePage(...constructorArgs).

After we laid out the page objects with selectors and some helper functionality, we then wrote the E2E tests and commonly modeled this test formula:
  • Set up or tear down through the API what is necessary to reset the test conditions to the expected starting point before running the actual tests.
  • Log in to a dedicated user for the test so whenever we visited pages directly we would stay logged in and did not have to go through the UI. We created a simple login helper function that takes in a username and password that makes the same API call we use for our login page and which eventually returns back our auth token needed to stay logged in and to pass along the headers of protected API requests. Other companies may have even more custom internal endpoints or tools to create brand new users with seed data and configurations quickly, but we, unfortunately, did not have one fleshed out enough. We would do it the old-fashioned way and create dedicated test users in our environments with different configurations through the UI and often broke up tests for pages with distinct users to avoid clashing of resources and remain isolated when tests ran in parallel. We had to make sure the dedicated test users were not touched by others or else the tests would break when someone unknowingly tinkered with one of them.
  • Automate the steps as if an end-user would interact with the feature/page. Typically, we would visit the page which holds our feature flow and begin to follow the high-level steps an end-user would such as filling out inputs, clicking buttons, waiting for modals or banners to appear, and observing tables for changed outputs as a result of the action. By using our handy page objects and selectors, we quickly implemented each step and, as sanity checks along the way, we would assert about what the user should or should not see on the page during the feature flow to be certain things are behaving as expected before and after each step. We were also deliberate about choosing high-value happy path tests and sometimes easily reproducible common error states, deferring the rest of the lower level testing to unit and integration tests.
Here is a rough example of the general layout of our E2E tests (this strategy applied to other testing frameworks we tried as well):


On a side note, we opted not to cover all the tips and gotchas for WebdriverIO and E2E best practices in this blog post series, but we will talk about those topics in a future blog post so stay tuned!

Step 4: Dockerizing all the Tests

When executing each Buildkite pipeline step on a new AWS machine in the cloud, we could not simply call “npm run uitests:staging” because those machines do not have Node, browsers, our application code, or any other dependencies to actually run the tests.

To solve this, we bundled up all the dependencies such as Node, Selenium, Chrome, and the application code in a Docker container for the WebdriverIO tests to run successfully. We took advantage of Docker and Docker Compose to assemble all the services necessary to get up and running, which translated into Dockerfiles and docker-compose.yml files and plenty of experimentation with spinning up Docker containers locally to get things working.

To provide more context, we were not experts in Docker, so it did take considerable ramp up time to understand how to put things all together. There are multiple ways to Dockerize WebdriverIO tests and we found it difficult to orchestrate many different services together and sift through varying Docker images, Compose versions, and tutorials until things worked.

We will demonstrate mostly fleshed out files that matched one of our teams’ configurations and we hope this provides insights for you or anyone tackling the general problem of Dockerizing Selenium-based tests.

On a high-level, our tests demanded the following:
  • Selenium to execute commands against and communicate with a browser. We employed Selenium Hub to spin up multiple instances at will and downloaded the image, “selenium/hub”, for the selenium-hub service in the docker-compose file.
  • A browser to run against. We brought up Selenium Chrome instances and installed the image, “selenium/node-chrome-debug”, for the selenium-chrome service in the docker-compose.yml file.
  • Application code to run our test files with any other Node modules installed. We created a new Dockerfile to provide an environment with Node to install npm packages and run package.json scripts, copy over the test code, and assign a service dedicated to running the test files named uitests in the docker-compose.yml file.
To bring up a service with all of our application and test code necessary to run the WebdriverIO tests, we crafted a Dockerfile called Dockerfile.uitests and installed all the node_modules and copied the code over to the image’s working directory in a Node environment. This would be used by our uitests Docker Compose service and we achieved the Dockerfile setup in the following way:


In order to bring up the Selenium Hub, Chrome browser, and application test code together for the WebdriverIO tests to run, we outlined the selenium-hub, selenium-chrome, and uitests services in the docker-compose.uitests.yml file:


We hooked up the Selenium Hub and Chrome images through environment variables, 
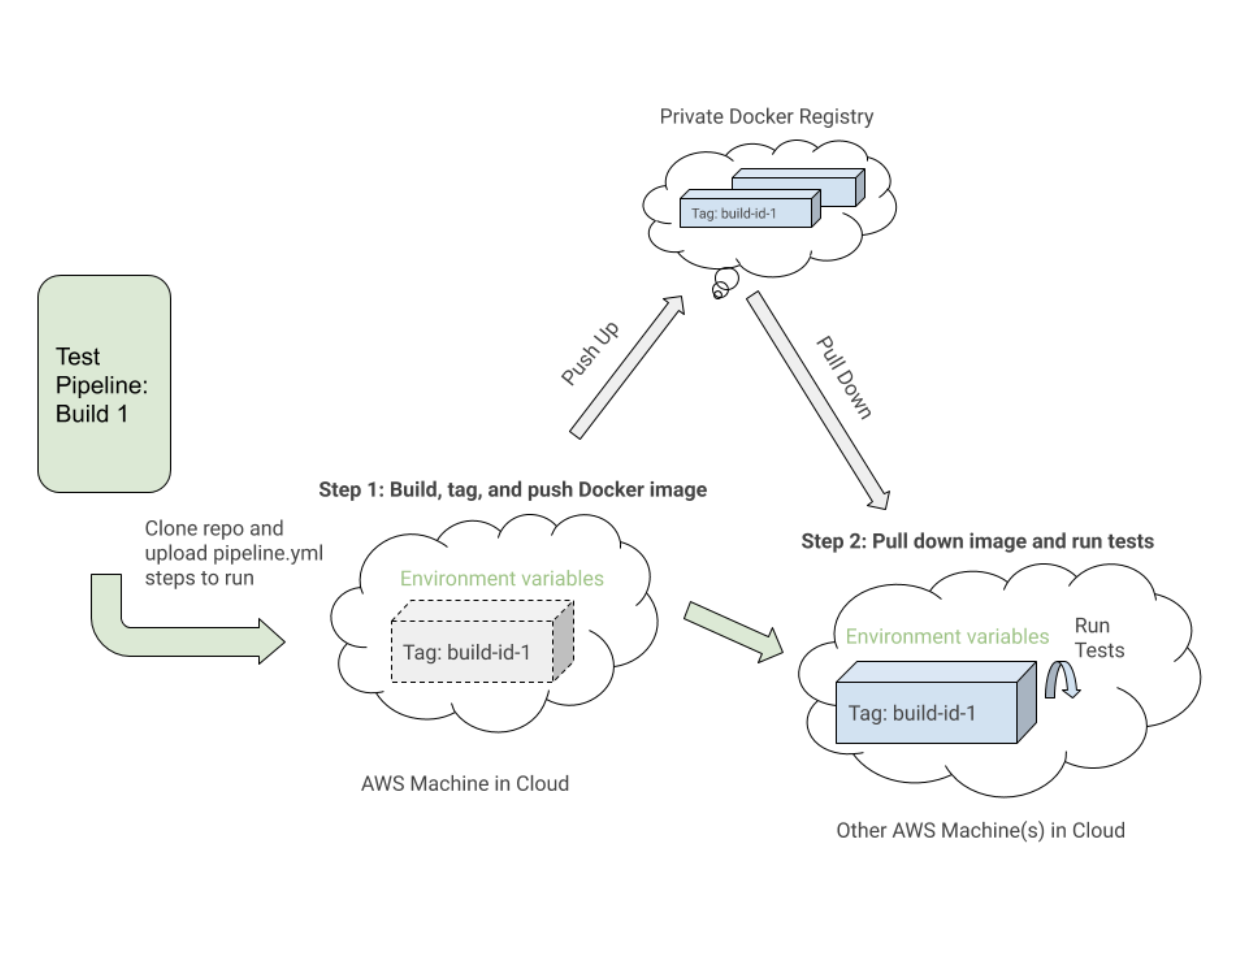
depends_on, and exposing ports to services. Our test application code image would eventually be pushed up and pulled from a private Docker registry we manage.

We would build out the Docker image for the test code during CICD with certain environment variables like VERSION and PIPELINE_SUFFIX to reference the images by a tag and more specific name. We would then start up the Selenium services and execute commands through the uitests service to execute the WebdriverIO tests.

As we built out our Docker Compose files, we leveraged the helpful commands like docker-compose up and docker-compose down with the Mac Docker installed on our machines to locally test our images had the proper configurations and ran smoothly before integrating with Buildkite. We documented all the commands needed to construct the tagged images, push them up to the registry, pull them down, and run the tests according to environment variable values.

Step 5: Integrating with CICD

After we established working Docker commands and our tests ran successfully within a Docker container against different environments, we began to integrate with Buildkite, our CICD provider.

Buildkite provided ways to execute steps in a .yml file on our AWS machines with Bash scripts and environment variables set either through the code or the Buildkite settings UI for our repo’s pipeline.

Buildkite also allowed us to trigger this testing pipeline from our main deploy pipeline with exported environment variables and we would reuse these test steps for other isolated test pipelines that would run on a schedule for our QAs to monitor and look at.

At a high level, our testing Buildkite pipelines for WebdriverIO and later Cypress ones shared the following similar steps:
  • Set up the Docker images. Build, tag, and push the Docker images required for the tests up to the registry so we can pull it down in a later step.
  • Run the tests based on environment variable configurations. Pull down the tagged Docker images for the specific build and execute the proper commands against a deployed environment to run selected test suites from the set environment variables.


Here is a close example of a 
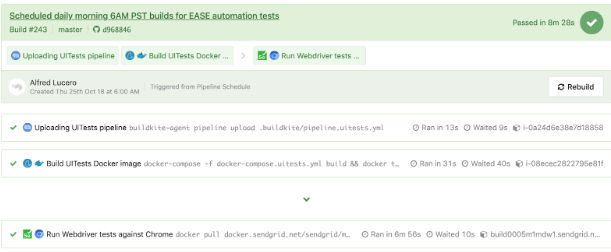
pipeline.uitests.yml file that demonstrates setting up the Docker images in the “Build UITests Docker Image” step and running the tests in the “Run Webdriver tests against Chrome” step:


One thing to notice is the first step, “Build UITests Docker Image”, and how it sets up the Docker images for the test. It used the Docker Compose build command to build the uitests service with all of the application test code and tagged it with latest and ${VERSION} environment variable so we can eventually pull down that same image with the proper tag for this build in a future step.

Each step may execute on a different machine in the AWS cloud somewhere, so the tags uniquely identify the image for the specific Buildkite run. After tagging the image, we pushed up the latest and version tagged image up to our private Docker registry to be reused.

In the “Run Webdriver tests against Chrome” step, we pull down the image we built, tagged, and pushed in the first step and start up the Selenium Hub, Chrome, and tests services. Based on environment variables such as $UITESTENV and $UITESTSUITE, we would pick and choose the type of command to run like npm run uitest: and the test suites to run for this specific Buildkite build such as --suite $UITESTSUITE.

These environment variables would be set through the Buildkite pipeline settings or it would be triggered dynamically from a Bash script that would parse a Buildkite select field to determine which test suites to run and against which environment.

Here is an example of WebdriverIO tests triggered in a dedicated tests pipeline, which also reused the same 
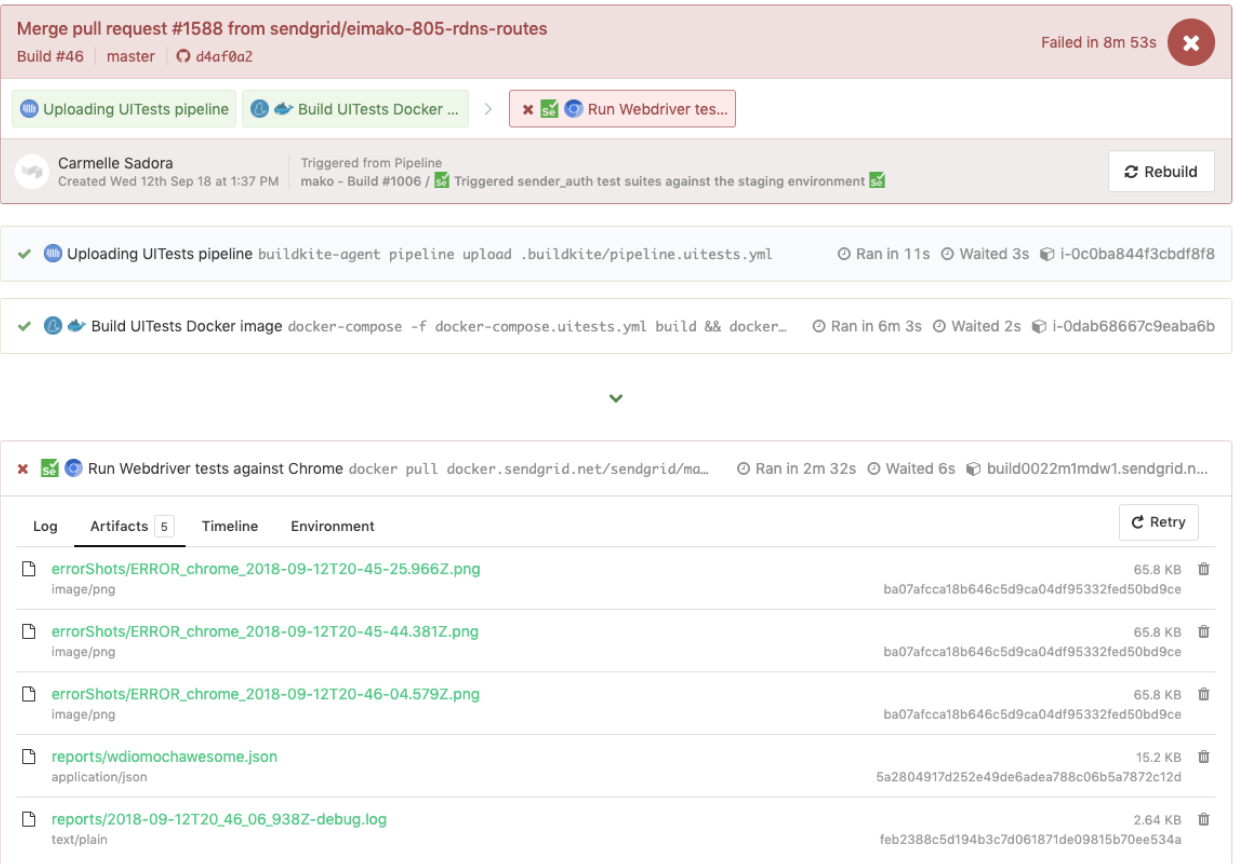
pipeline.uitests.yml file but with environment variables set where the pipeline was triggered. This build failed and had error screenshots for us to take a look at under the Artifacts tab and the console output under the Logs tab. Remember the artifact_paths in the pipeline.uitests.yml (https://gist.github.com/alfredlucero/71032a82f3a72cb2128361c08edbcff2#file-pipeline-uitests-yml-L38), screenshots settings for `mochawesome` in the `wdio.conf.js` file (https://gist.github.com/alfredlucero/4ee280be0e0674048974520b79dc993a#file-wdio-conf-js-L39), and mounting of the volumes in the `uitests` service in the `docker-compose.uitests.yml` (https://gist.github.com/alfredlucero/d2df4533a4a49d5b2f2c4a0eb5590ff8#file-docker-compose-yml-L32)?

We were able to hook up the screenshots to be accessible through the Buildkite UI for us to download directly and see right away to help with debugging tests as shown below.


Another example of WebdriverIO tests running in a separate pipeline on a schedule for a specific page using the pipeline.uitests.yml file except with environment variables already configured in the Buildkite pipeline settings is displayed underneath.


It’s important to note that every CICD provider has different functionality and ways to integrate steps into some sort of deploy process when merging in new code whether it is through .yml files with specific syntax, GUI settings, Bash scripts, or any other means.

When we switched from Jenkins to Buildkite, we drastically improved the ability for teams to define their own pipelines within their respective codebases, parallelizing steps across scaling machines on demand, and utilizing easier to read commands.

Regardless of the CICD provider you may use, the strategies of integrating the tests will be similar in setting up the Docker images and running the tests based on environment variables for portability and flexibility.

Tradeoffs with WebdriverIO

After converting a considerable number of the custom Ruby Selenium solution tests over to WebdriverIO tests and integrating with Docker and Buildkite, we improved in some areas but still felt similar struggles to the old system that ultimately led us to our next and final stop with Cypress for our E2E testing solution.

Here is a list of some of the pros we found from our experiences with WebdriverIO in comparison to the custom Ruby Selenium solution:
  • Tests were written purely in JavaScript or TypeScript rather than Ruby. This meant less context switching between languages and less time spent re-learning Ruby every time we wrote E2E tests.
  • We colocated tests with application code rather than away in a Ruby shared repo. We no longer felt dependent on other teams’ tests failing and took more direct ownership of the E2E tests for our features in our repos.
  • We appreciated the option of cross-browser testing. With WebdriverIO we could spin up tests against different capabilities or browsers such as Chrome, Firefox, and IE, though we focused mainly on running our tests against Chrome as over 80% of our users visited our app through Chrome.
  • We entertained the possibility of integrating with third-party services. WebdriverIO documentation explained how to integrate with third-party services like BrowserStack and SauceLabs to help with covering our app across all devices and browsers.
  • We had the flexibility to choose our own test runner, reporter, and services. WebdriverIO was not prescriptive with what to use so each team took the liberty in deciding whether or not to use things like Mocha and Chai or Jest and other services. This could also be interpreted as a con as teams started to drift from each other’s setup and it required a considerable amount of time to experiment with each of the options for us to choose.
  • The WebdriverIO API, CLI, and documentation were serviceable enough to write tests and integrate with Docker and CICD. We could have many different config files, group up specs, execute tests through the command line, and write tests following the page object pattern. However, the documentation could be clearer and we had to dig into a lot of weird bugs. Nonetheless, we were able to convert our tests over from the Ruby Selenium solution.
We made progress in a lot of areas that we lacked in the prior Ruby Selenium solution, but we encountered a lot of showstoppers that prevented us from going all in with WebdriverIO such as the following:
  • Since WebdriverIO was still Selenium-based, we experienced a lot of weird timeouts, crashes, and bugs, reminding us of negative flashbacks with our old Ruby Selenium solution. Sometimes our tests would crash altogether when we would select many elements on the page and the tests would run slower than we would like. We had to figure out workarounds through a lot of Github issues or avoided certain methodologies when writing tests.
  • The overall developer experience was suboptimal. The documentation provided some high level overview of the commands but not enough examples to explain all the ways to use it. We avoided writing E2E tests with Ruby and finally got to write tests in JavaScript or TypeScript, but the WebdriverIO API was a bit confusing to deal with. Some common examples were the usage of $ vs. $$ for singular vs. plural elements, $(‘...’).waitForVisible(9000, true) for waiting for an element to not be visible, and other unintuitive commands. We experienced a lot of flaky selectors and had to explicitly $(...).waitForVisible() for everything.
  • Debugging tests were extremely painful and tedious for devs and QAs. Whenever tests failed, we only had screenshots, which would often be blank or not capturing the right moment for us to deduce what went wrong, and vague console error messages that did not point us in the right direction of how to solve the problem and even where the issue occurred. We often had to re-run the tests many times and stare closely at the Chrome browser running the tests to hopefully put things together as to where in the code our tests failed. We used things like browser.debug() but it often did not work or did not provide enough information. We gradually gathered a bunch of console error messages and mapped them to possible solutions over time but it took lots of pain and headache to get there.
  • WebdriverIO tests were tough to set up with Docker. We struggled with trying to incorporate it into Docker as there were many tutorials and ways to do things in articles online, but it was hard to figure out a way that worked in general. Hooking up 2 to 3 services together with all these configurations led to long trial and error experiments and the documentation did not guide us enough in how to do that.
  • Choosing the test runner, reporter, assertions, and services demanded lots of research time upfront. Since WebdriverIO was flexible enough to allow other options, many teams had to spend plenty of time to even have a solid WebdriverIO infrastructure after experimenting with a lot of different choices and each team can have a completely different setup that doesn’t transfer over well for shared knowledge and reuse.
To summarize our WebdriverIO and STUI comparison, we analyzed the overall developer experience (related to tools, writing tests, debugging, API, documentation, etc.), test run times, test passing rates, and maintenance as displayed in this table:

Moving On to Cypress

At the end of the day, our WebdriverIO tests were still flaky and tough to maintain. More time was still spent debugging tests in dealing with weird Selenium issues, vague console errors, and somewhat useful screenshots than actually reaping the benefits of seeing tests fail for when the backend or frontend encountered issues.

We appreciated cross-browser testing and implementing tests in JavaScript, but if our tests could not pass consistently without much headache for even Chrome, then it became no longer worth it and we would then simply have a STUI 2.0.

With WebdriverIO we still strayed from the crucial aspect of providing a way to write consistent, debuggable, maintainable, and valuable E2E automation tests for our frontend applications in our original goal. Overall, we learned a lot about integrating with Buildkite and Docker, using page objects, and outlining tests in a structured way that will transfer over to our final solution with Cypress.

If we felt it was necessary to run our tests in multiple browsers and against various third-party services, we could always circle back to having some tests written with WebdriverIO, or if we needed something fully custom, we would revisit the STUI solution.

Ultimately, neither solution met our main goal for E2E tests, so follow us on our journey in how we migrated from STUI and WebdriverIO to Cypress in part 2 of the blog post series.

Recommended For You


Most Popular


Send With Confidence

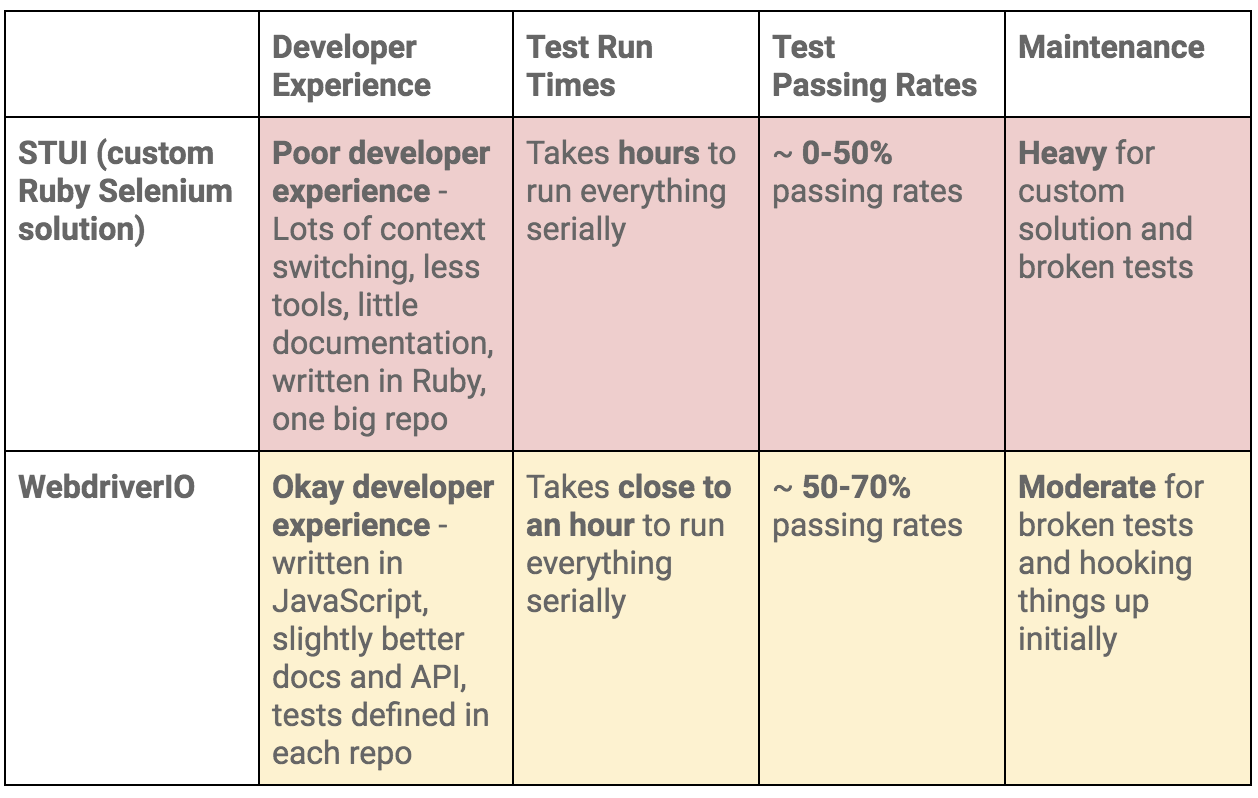
Partner with the email service trusted by developers and marketers for time-savings, scalability, and delivery expertise.