Before you officially change up how your assets return with security headers, you should verify the function works after you configure everything manually through the AWS Console. It is crucial that your web applications should be able to load up and function properly with the security headers added to your network responses. The last thing you want to hear is an unexpected outage occurring due to the security headers, so test them thoroughly in your development environments.
It is also important to know what exactly you will be writing in Terraform code later to save this configuration in your codebase. In case you do not know about Terraform, it provides you a way to write and manage your cloud infrastructure through code.
Tip: Take a look at the Terraform docs to see if it can help you maintain your complex configurations without needing to remember all the steps you did in the cloud consoles.
Let’s get started with how to set things up manually through the AWS Console.
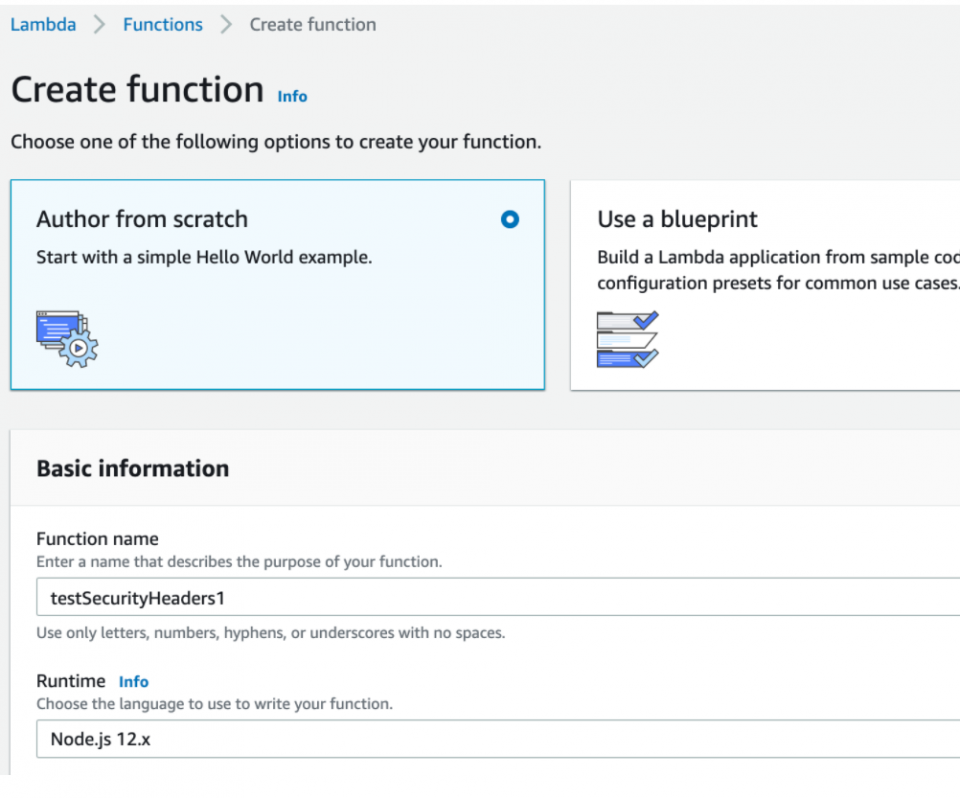
- First, you need to create the Lambda@Edge function in the “us-east-1” region. Going to the Lambda services page, we will click “Create Function” and name it something like “testSecurityHeaders1.”
2.
You may use an existing role with permissions to run the function at edge servers or you can use one of their role policy templates, such as “Basic Lambda@Edge Permissions…,” and name it “lambdaedgeroletest.”
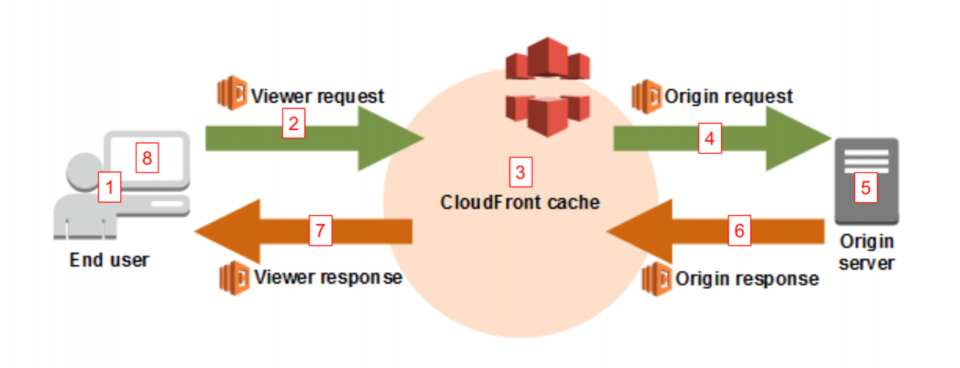
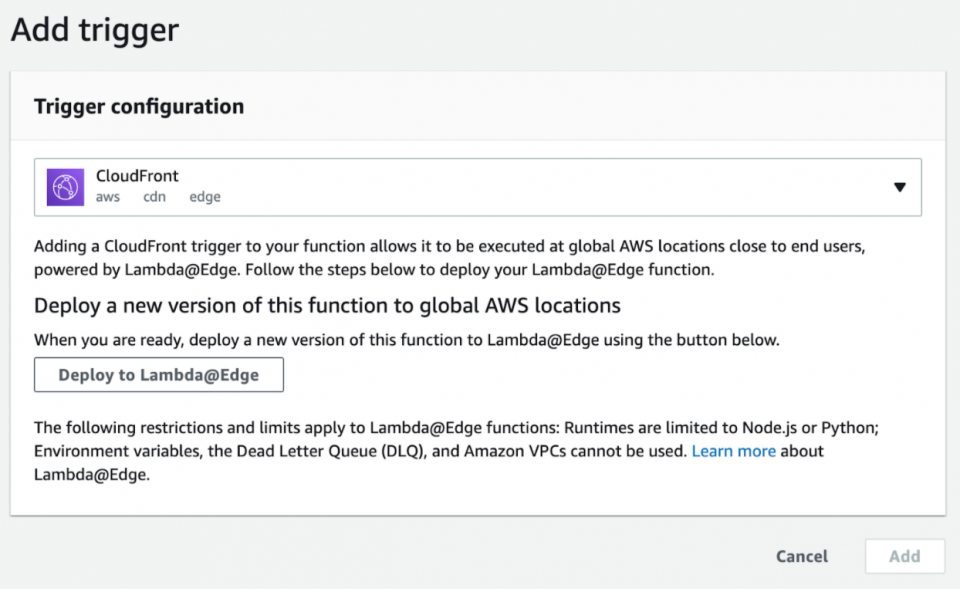
 3. After creating your test Lambda function and role, you should see something like this where you’ll notice the “Add Trigger” button for the function. This is where you will eventually associate the Lambda with a CloudFront distribution’s cache behavior triggered on the origin response event.
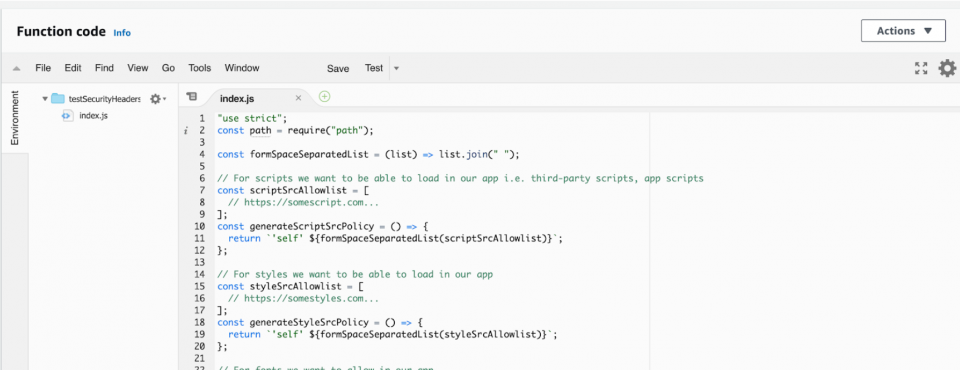
 4. Next, you need to edit the function code with the security headers code we crafted before and hit “Save.”
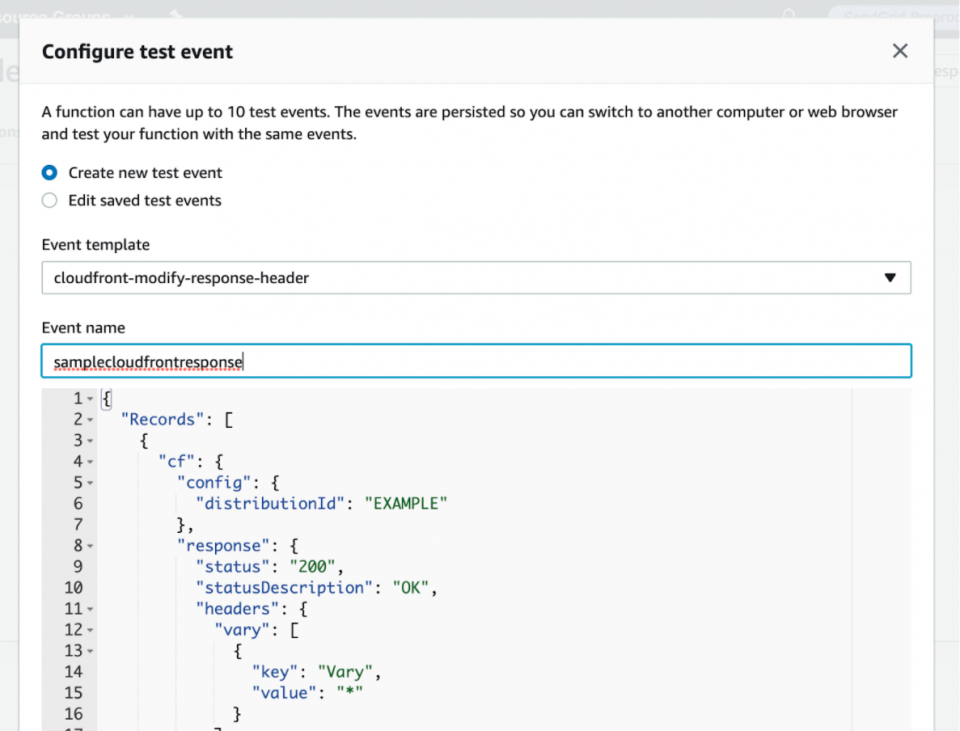
 5. After saving the function code, let’s test out if your Lambda function even works by scrolling to the top and hitting the “Test” button. You will create a test event named “samplecloudfrontresponse” using the “cloudfront-modify-response-header” event template to mock an actual CloudFront origin response event and to see how your function runs against it.
You will notice things like the “cf.response” headers object that your Lambda function code will modify.
5. After saving the function code, let’s test out if your Lambda function even works by scrolling to the top and hitting the “Test” button. You will create a test event named “samplecloudfrontresponse” using the “cloudfront-modify-response-header” event template to mock an actual CloudFront origin response event and to see how your function runs against it.
You will notice things like the “cf.response” headers object that your Lambda function code will modify.
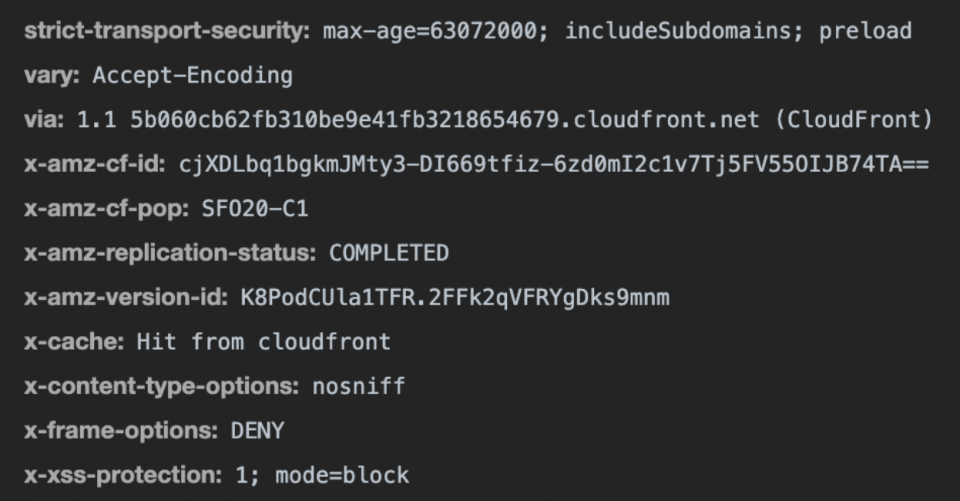
 6. After creating the test event, you will click the “Test” button again and should see how the Lambda function ran against it. It should run successfully with logs displaying the resulting response with added security headers like this.
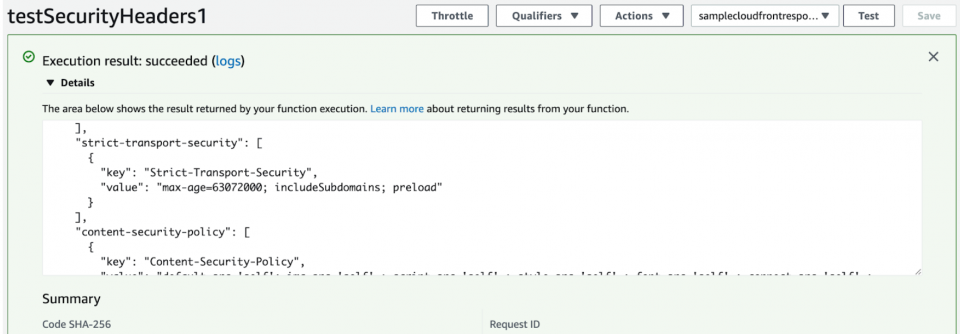 Great, the Lambda function looks like it appended the security headers to the response correctly!
7. Let’s go back up to the “Designer” area and click the “Add Trigger” button so that you can associate the Lambda function with your CloudFront distribution’s cache behaviors on the origin response event. Make sure to select a “CloudFront” trigger and click the “Deploy to Lambda@Edge” button.
Great, the Lambda function looks like it appended the security headers to the response correctly!
7. Let’s go back up to the “Designer” area and click the “Add Trigger” button so that you can associate the Lambda function with your CloudFront distribution’s cache behaviors on the origin response event. Make sure to select a “CloudFront” trigger and click the “Deploy to Lambda@Edge” button.
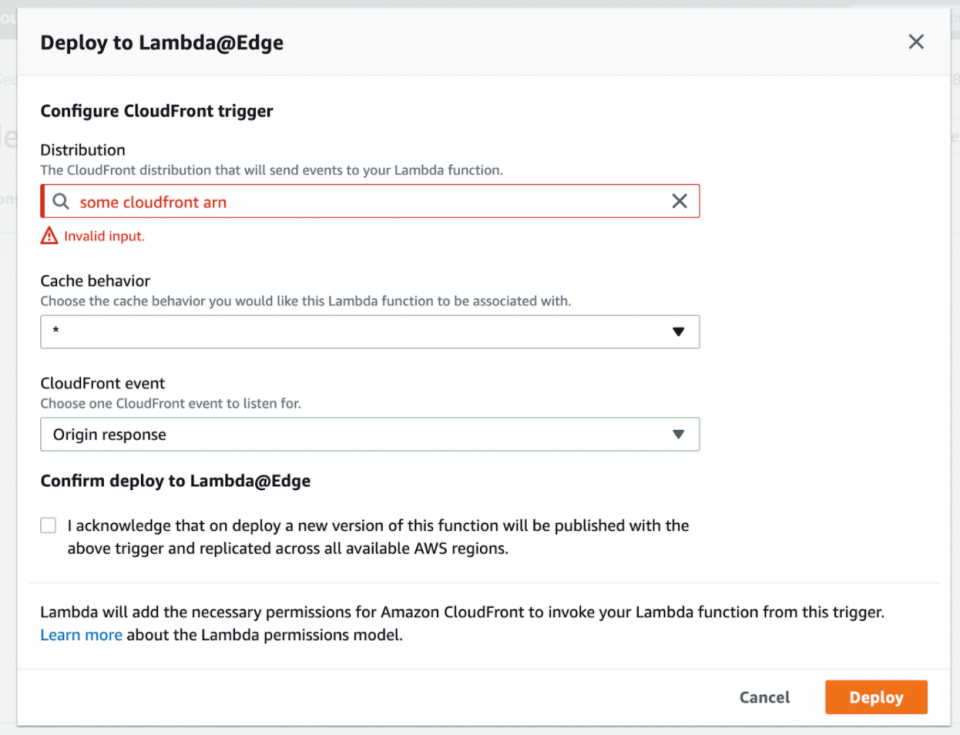
 8. Next, select the CloudFront distribution (in our example, we cleared the input here for security reasons) and a cache behavior to associate with it.
You then choose the “*” cache behavior and select the “Origin response” event to match on all request paths to your CloudFront distribution and to make sure the Lambda function always runs for all origin responses.
You then check off the acknowledgement before clicking “Deploy” to officially deploy your Lambda function.
8. Next, select the CloudFront distribution (in our example, we cleared the input here for security reasons) and a cache behavior to associate with it.
You then choose the “*” cache behavior and select the “Origin response” event to match on all request paths to your CloudFront distribution and to make sure the Lambda function always runs for all origin responses.
You then check off the acknowledgement before clicking “Deploy” to officially deploy your Lambda function.
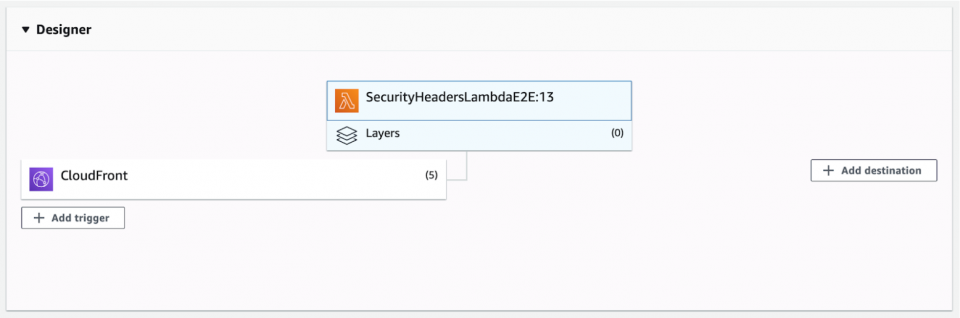
 9. After successfully associating your Lambda function with all of your relevant CloudFront distribution’s cache behaviors, you should see something similar to this in the Lambda dashboard “Designer” area where you can see the CloudFront triggers and have the option of viewing or deleting them.
 Whenever you may need to make changes to your Lambda code, we recommend:
-
- Publish a new version through the “Actions” button dropdown
- Delete the triggers on the older version (you can click on the “Qualifiers” dropdown to see all the versions of your Lambda)
- Associate the triggers with the newest version number you recently published
 Upon deploying your Lambda for the first time or after publishing a new version of your Lambda and associating the triggers with the newer Lambda version, you may not see the security headers right away in your responses for your web application. This is due to how the edge servers in CloudFront cache the responses. Depending on how long you set the time-to-live in your cache behaviors, you may have to wait a while to see the new security headers unless you do a cache invalidation in your affected CloudFront distribution.
After redeploying your changes to your Lambda function, it often takes time for the cache to clear out (depending on your CloudFront cache settings) before your responses have the latest tweaks to your security headers.
Upon deploying your Lambda for the first time or after publishing a new version of your Lambda and associating the triggers with the newer Lambda version, you may not see the security headers right away in your responses for your web application. This is due to how the edge servers in CloudFront cache the responses. Depending on how long you set the time-to-live in your cache behaviors, you may have to wait a while to see the new security headers unless you do a cache invalidation in your affected CloudFront distribution.
After redeploying your changes to your Lambda function, it often takes time for the cache to clear out (depending on your CloudFront cache settings) before your responses have the latest tweaks to your security headers.
Tip: To avoid refreshing the page a lot or sitting around unsure if your changes worked, kick off a CloudFront cache invalidation to speed up the process of clearing out the cache so that you can see your updated security headers.
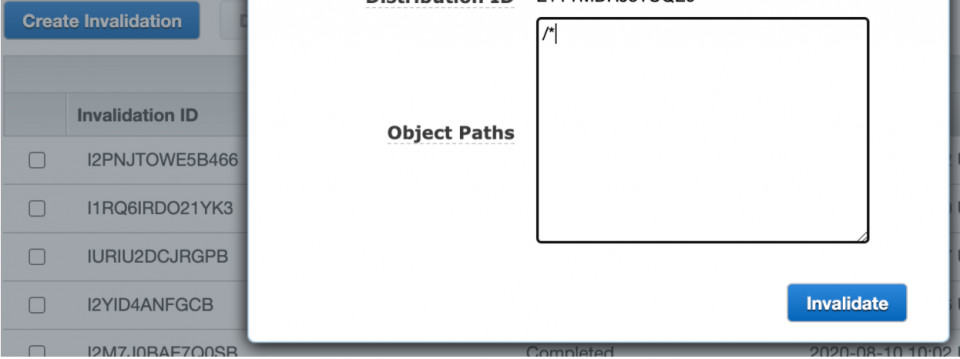
Go to your CloudFront Services page, wait for your CloudFront distribution’s status to be deployed, meaning all the lambda associations are complete and deployed, and go to the “Invalidations” tab. Click “Create Invalidation” and put “/*” as the object path to invalidate all the things in the cache and hit “Invalidate.” This should not take too long, and after it’s complete, refreshing your web application should see the latest security header changes.
 As you iterate on your security headers based on what you find as violations or errors in your web application, you can repeat this process:
-
- Publishing a new Lambda function version
- Deleting the triggers on the old Lambda version
- Associating the triggers on the new version
- Cache invalidating your CloudFront distribution
- Testing your web application
- Repeating until you feel confident and safe things work as expected without any blank pages, failed API requests, or console security errors
Once things are stable, you can optionally move on to Terraforming what you just did manually into code configurations, assuming you have Terraform integrated with your AWS accounts. We will not cover how to set up Terraform from the beginning, but we will show you snippets of what the Terraform code will look like.
After iterating on the Lambda@Edge function for security headers in the “us-east-1” region, we wanted to add this to our Terraform codebase for code maintainability and version control down the road.
For all the cache behaviors that we implemented already, we had to associate the cache behavior with the Lambda@Edge function, which the origin response event triggered.
The following steps assume you already have most of the CloudFront distributions and S3 buckets configured through Terraform. We will focus on the main modules and properties that relate to Lambda@Edge and add the trigger to the CloudFront distribution’s cache behaviors. We will not walk through how to set up your S3 buckets and other CloudFront distribution settings from scratch through Terraform, but we hope you can see the level of effort to accomplish this on your own.
We currently break up our AWS resources into separate module folders and pass in variables into those modules for flexibility in our configuration. We have an apply folder with a development and production subfolder and each has its own main.tf file where we call these modules with certain input variables to instantiate or modify our AWS resources.
Those subfolders also each have a lambdas folder where we hold our Lambda code such as a security_headers_lambda.js file. The security_headers_lambda.js has the same code we have been using in our Lambda function when we tested out manually, except we are also saving it in our codebase for us to zip and upload through Terraform.
1. First, we need a reusable module to zip up our Lambda file before it gets uploaded and published as another version of our Lambda@Edge function. This takes in a path to our Lambda folder holding the eventual Node.js Lambda function.