Once the code is written, we must must tell Iron what to do with it, in
our .worker file (like a
Procfile on Heroku). After this is done, all that’s required is that we set up our worker on Iron.
To set up our worker, we can use some
pre-written code, SendGrid Scheduler that takes all the hassle out of the process. To use it:
- Clone the SendGrid Scheduler repo:
git clone https://github.com/nquinlan/sendgrid-scheduler - Move into the repo:
cd sendgrid-scheduler - Place your iron.json file in the repo: e.g.
mv ~/Downloads/iron.json ./ (You can download your iron.json by clicking credentials then “Download iron.json” found in your project, while on the Iron.io HUD) - Upload the worker:
iron_worker upload SendGridSchedulerThis requires the iron_worker gem, you can get it with:
gem install iron_worker
Now that we’ve given Iron.io our worker, all that’s left is to use it! With Iron.io, you can use workers two ways: from the web interface or via the API. Both of these can prove useful when it comes to scheduling emails.
Either way, you need to provide the worker with a JSON payload of what you want to be in the email, plus your SendGrid API Credentials. The resulting payload will look something like:
{
"api_user" : "YOUR_SENDGRID_USERNAME",
"api_key" : "YOUR_SENDGRID_PASSWORD",
"to" : "nick@sendgrid.com",
"from" : "nick@sendgrid.com",
"subject" : "Look at this cool email!",
"text" : "I mean seriously, it was scheduled with Iron.io-- so cool!"
}
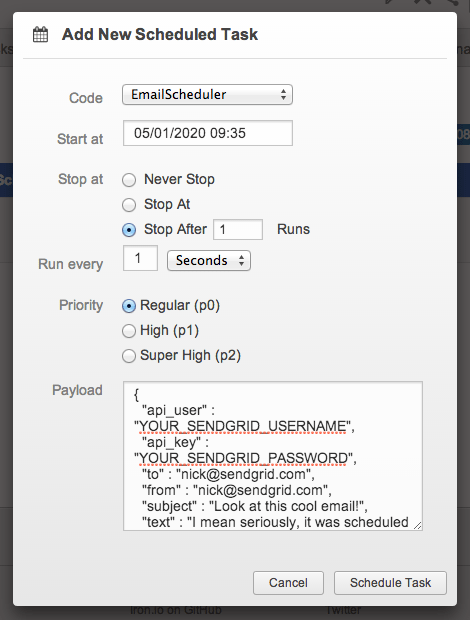
To use the worker through Iron.io’s
web interface or Heads Up Display (HUD), simply navigate to your project and select the Scheduled Tasks pane. In this pane, there’s a button that allows you to schedule a task.
Here, you can schedule the task to repeat or just run once in the future.
Personally, I have a task scheduled to run every Monday to email me and ask about my weekend.
Iron.io being an awesome developer services company gives you the ability to schedule workers from their API by
simply querying it or using
one of their many client libraries.
Using their client libraries makes scheduling an email simple. A few languages are shown below.
If you want to use the Iron Worker with Ruby, you can install the Gem:
$ gem install iron_worker_ng
Then require the Gem in your Ruby code:
require "iron_worker_ng"
Next initialize the client:
client = IronWorkerNG::Client.new(:token => 'IRON_IO_TOKEN', :project_id => 'IRON_IO_PROJECT_ID')
Let’s assume we’ve loaded our JSON Payload into a Ruby Hash as described above and are ready to send it:
payload = loaded_json_payload
Finally, let's schedule the worker to run in one hour:
schedule = client.schedules.create('SendGridScheduler', payload, {:start_at => Time.now + 3600})
A working copy of this code may be found with the SendGrid Scheduler.
More instructions for using the Iron.io Ruby Gem can be found on Github.
First install the Node package:
$ npm install iron_worker
Next require the package:
var iron_worker = require('iron_worker');
Initialize the client:
var worker = new iron_worker.Client({token: "IRON_IO_TOKEN", project_id: "IRON_IO_PROJECT_ID"});
Again, let’s assume we’ve loaded our JSON Payload into a Javascript Object as described above and are ready to send it:
var payload = loaded_json_payload;
Now schedule the worker to run in one hour:
worker.schedulesCreate("SendGridScheduler", payload, { "start_at" : Math.floor((new Date()).getTime()/1000) + 3600 }, function (err, body) {});
A working copy of this code may be found with the SendGrid Scheduler.
More instructions for using the Node Package can be found on Github.
To install the library,
follow the instructions on GitHub. Next, require the two classes:
require_once "IronCore.class.php";
require_once "IronWorker.class.php";
Initialize the Client:
$worker = new IronWorker(array(
    "token" => "IRON_IO_TOKEN",
    "project_id" => "IRON_IO_PROJECT_ID"
));
Again, let’s assume we’ve loaded our JSON Payload into a PHP Array as described above and are ready to send it:
$payload = $loaded_json_payload;
Schedule the worker to run in one hour:
$worker->postScheduleAdvanced("SendGridScheduler", $payload, time() + 3600);
A working copy of this code may be found with the SendGrid Scheduler.
More instructions for using the PHP Library can be found on Github.
Now you are ready to start scheduling emails using SendGrid and Iron.io in Ruby, Node or PHP. If you're looking for ideas, see this goal reminder application and use email to achieve them.
 There are tons of reasons to schedule an email: maybe you want to send an email daily or weekly, or perhaps, you just want to send an email in the morning rather than the evening. Luckily, with Iron.io and SendGrid this is easy.